Source code of support available at GitHub
Since while ago I wanted to share my experiences automatizing the product releases with Octopus from Visual Studio. Again, let’s do it through an example.
As it could not be otherwise, figure 1 shows the first package you should add to your project in order to create Octopus packages ready to be deployed: “OctoPack”. The latest package version available at the time of this tutorial was the “3.6.1” but we installed the “3.6.0” on purpose in order to show the update process.
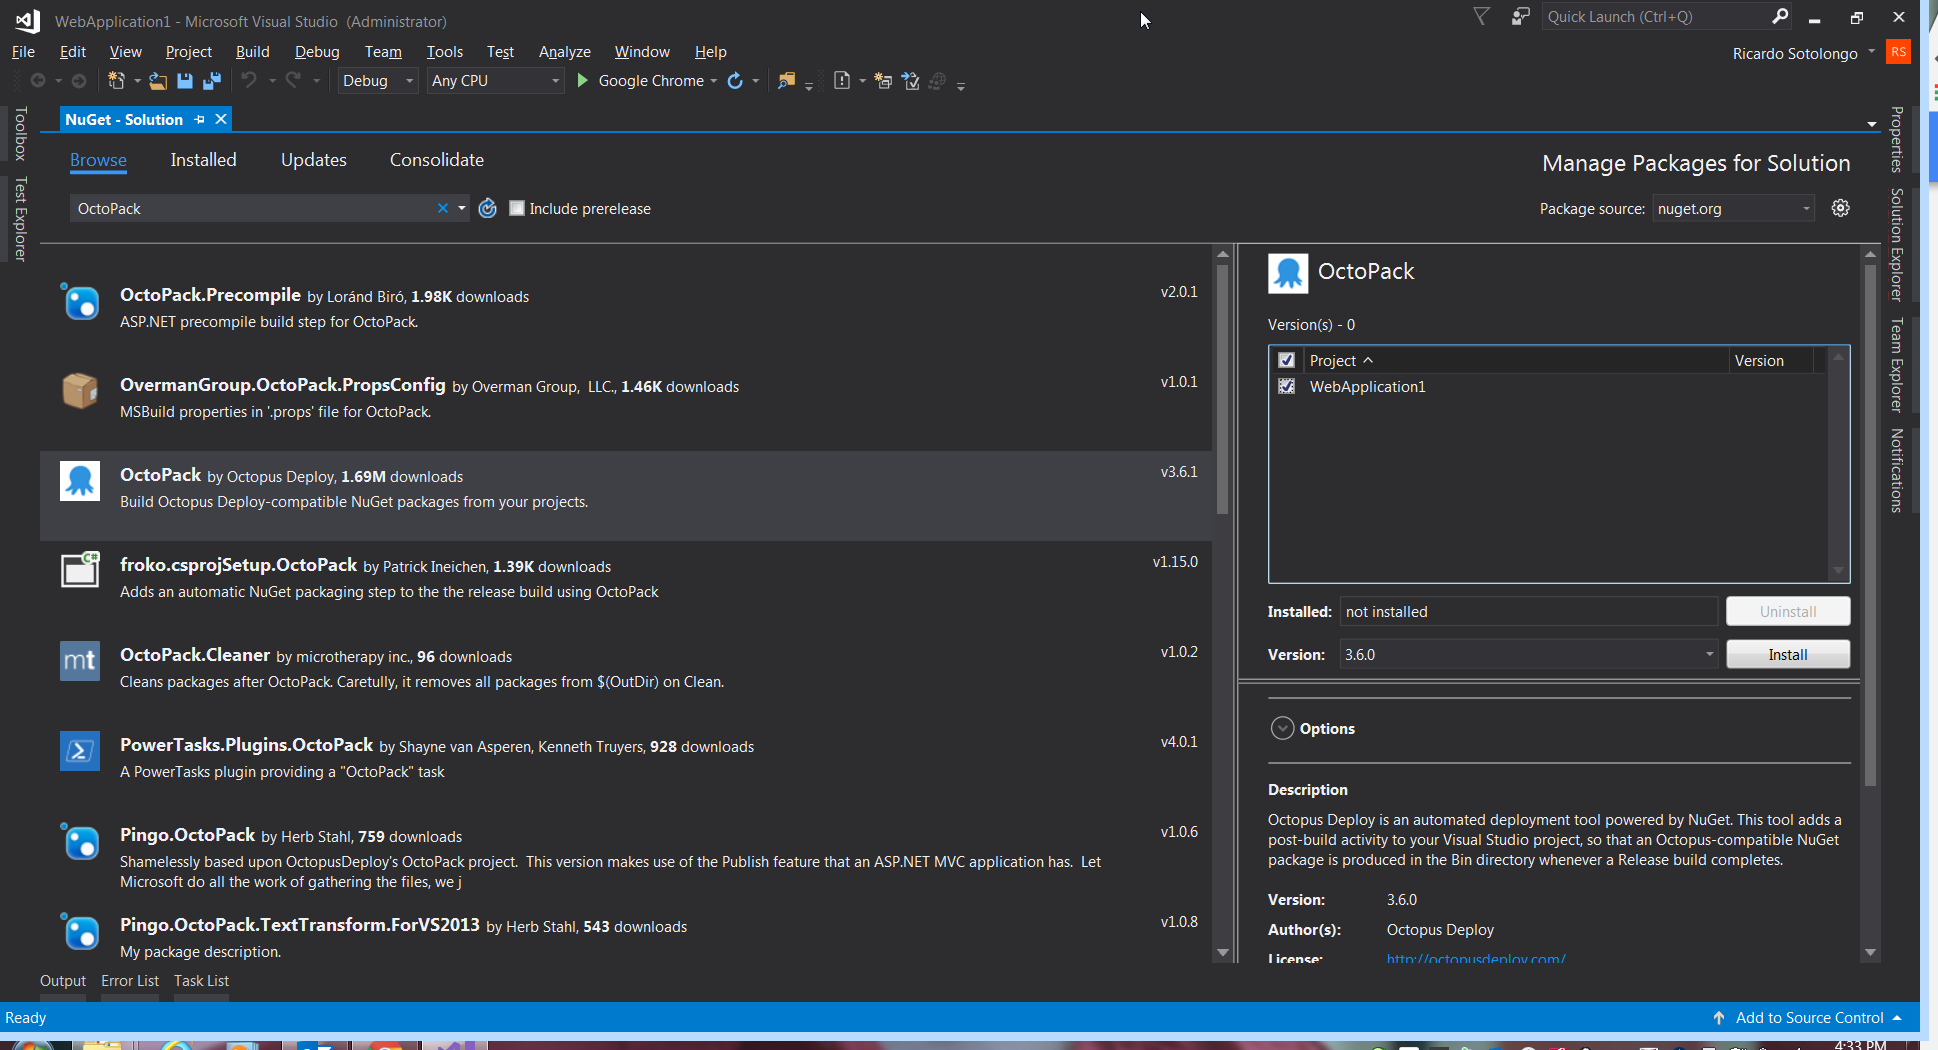
Figure 1.
Figure 2 show the second package that should be installed: “OctopusTool”. Same here, latest version available was the “4.17.0” but we installed the “4.15.7” with the same purpose.
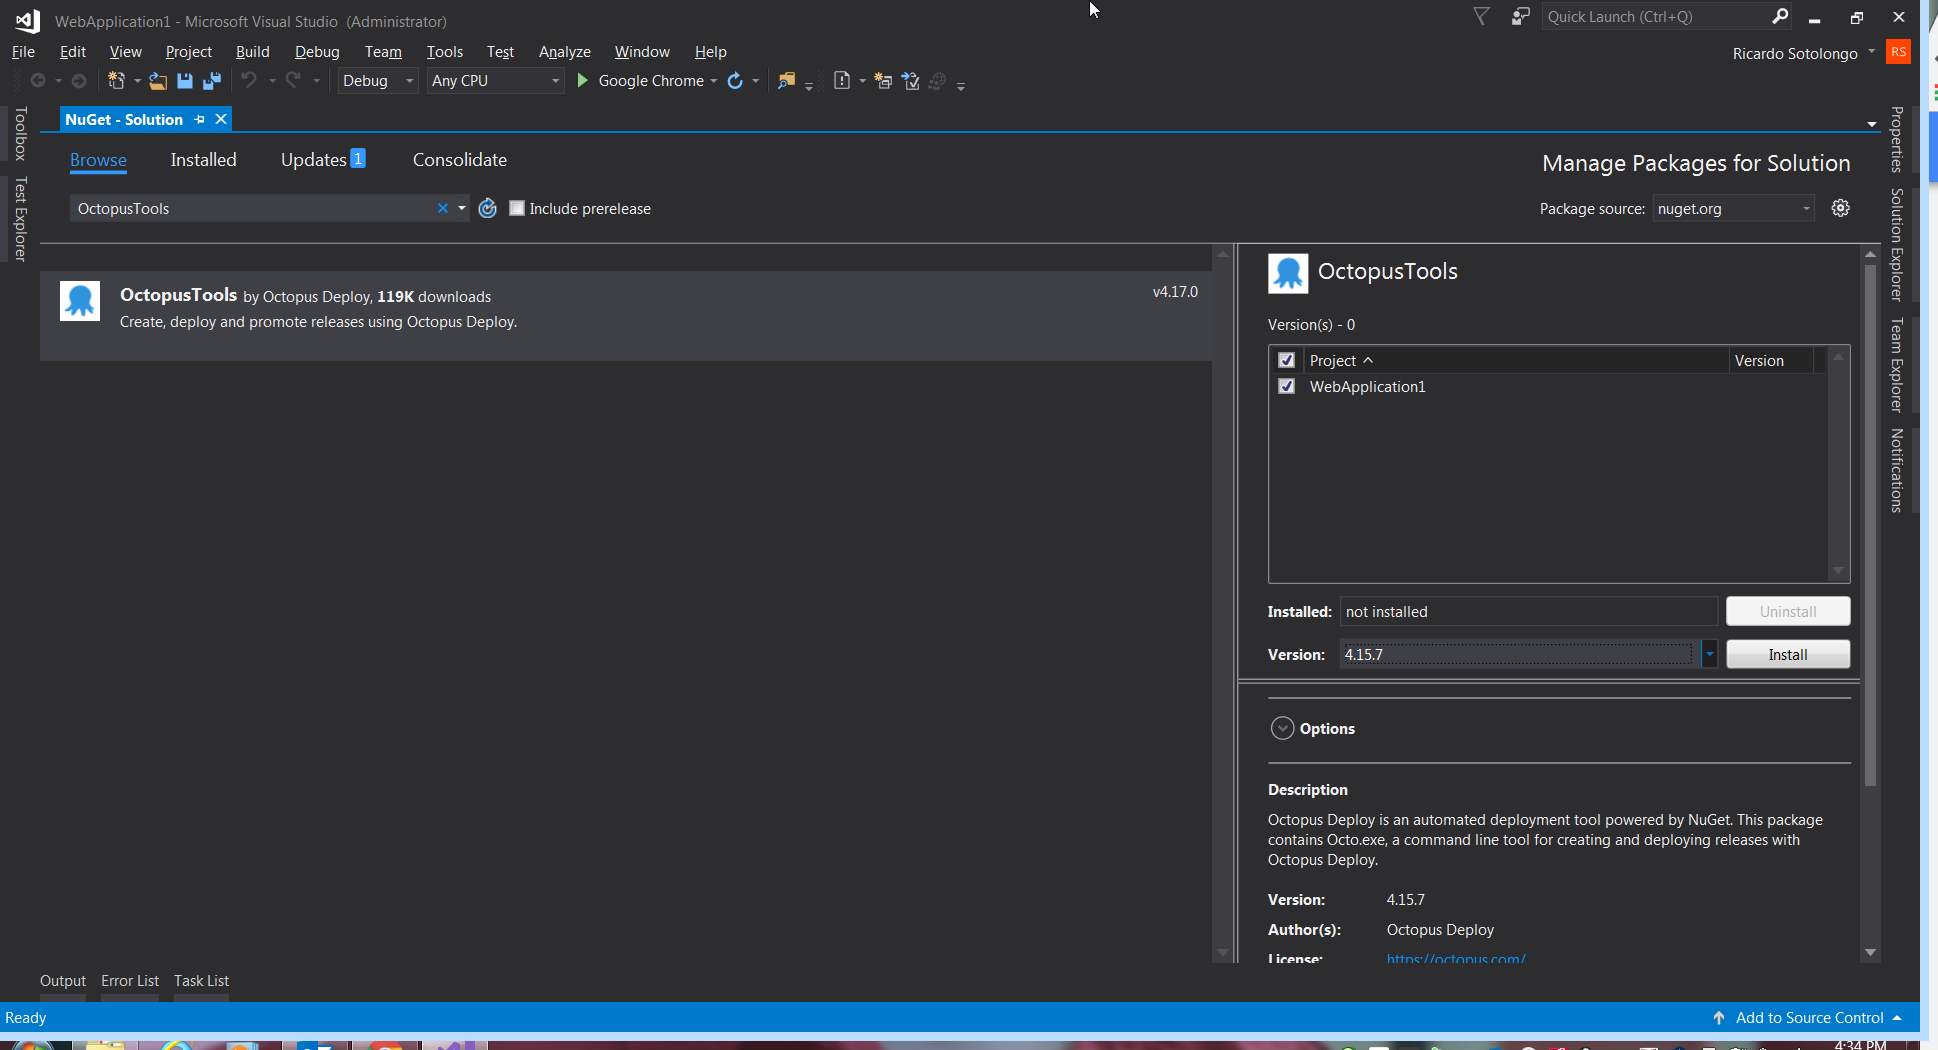
Figure 2.
Once both packages are installed we can check the “packages” folder inside solution folder (C:\Temp\WebApplication1\packages) in this case. Figure 3 show the folder contents.
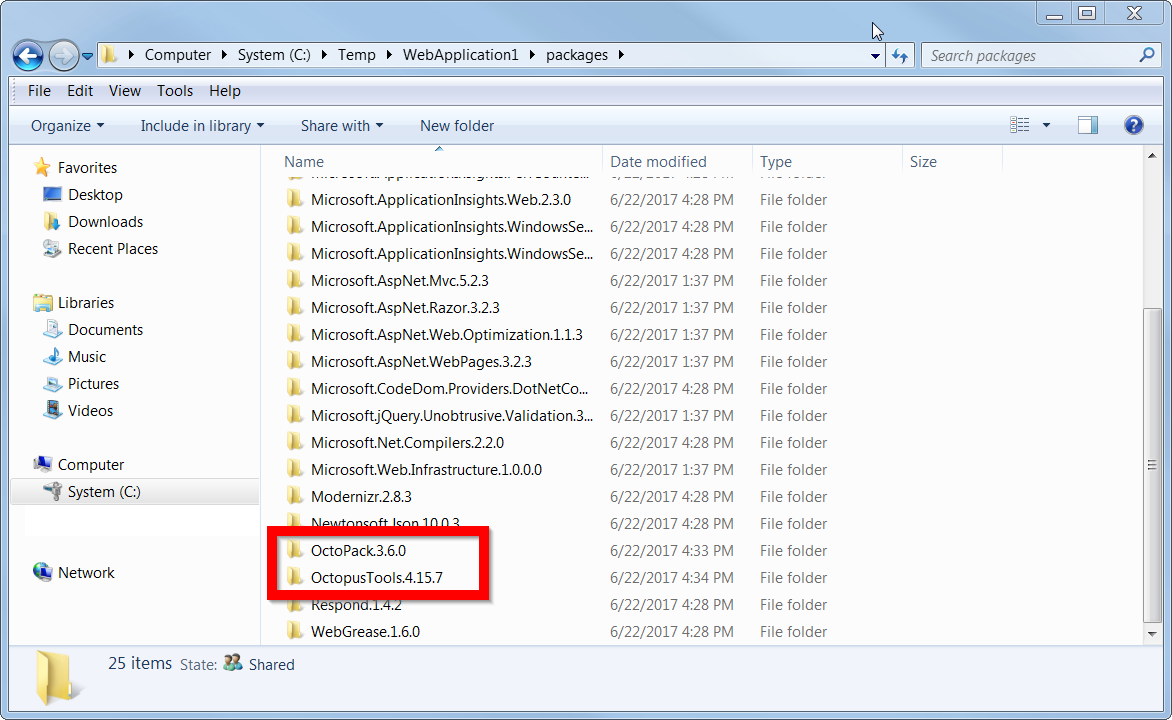
Figure 3.
Now start the funny steps. First, we need to open the project file (WebApplication1.csproj) in this case. At the end of the file we need to delete the “Import” task of “OctoPack.targets” from the NuGet package folder. This is VERY important step because have to be repeated every time “OctoPack” package is updated. Figure 4 show the line that needs to be deleted.
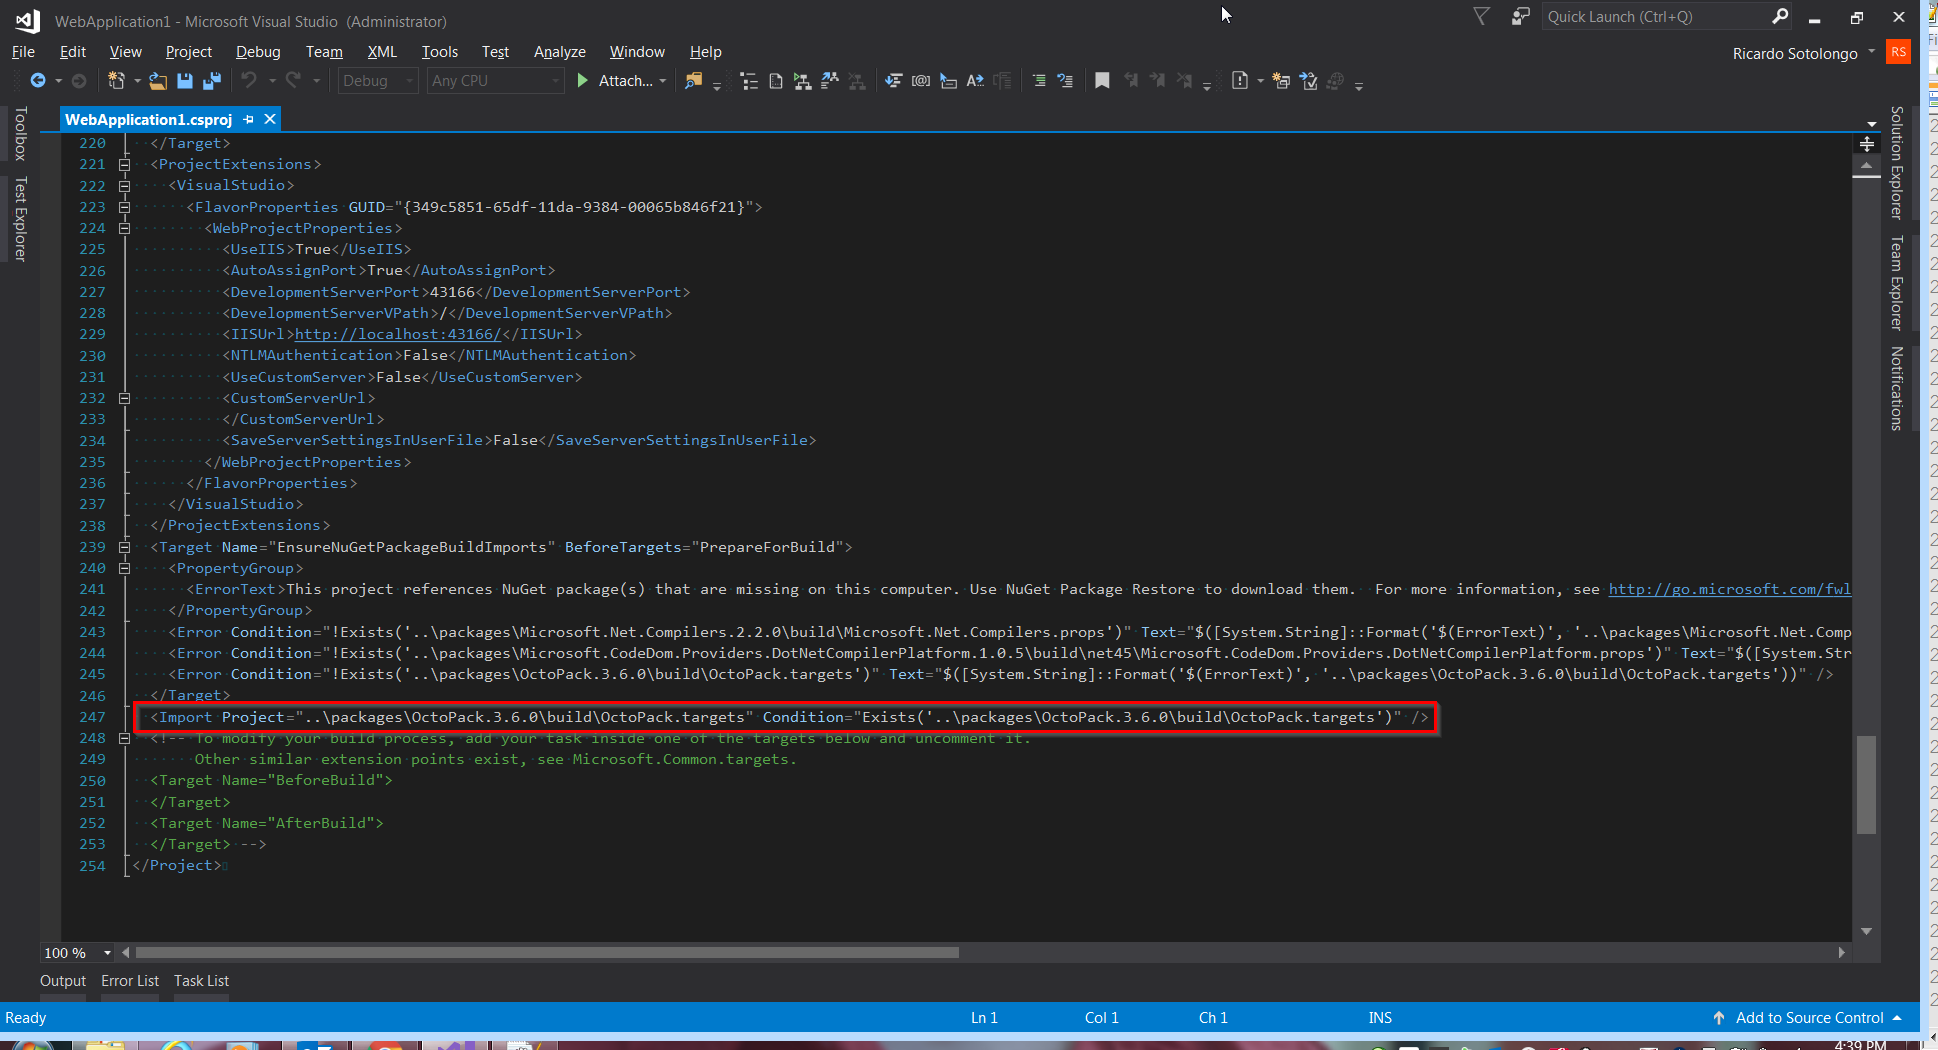
Figure 4.
Let’s explain a little bit deeper here. MSBuild will import and execute the targets of “OctoPack” in every build. If we keep that line the file that need to be modified is that one that is located in the package folder, meaning that normally is not part of the TFS controlled items and it will be loose in every package update. NuGet delete the old package folder once the new version is downloaded after an update. To avoid these rollbacks, and keep updated the packages at same time is good practice to delete this line and continue the process as I recommend in next steps.
Create a new folder inside the project to be deployed and copy the file “OctoPack.targets” to it. I usually call this folder “Deployment” and keep the file with the same name. I mean, copy “$(SolutionDir)\packages\OctoPack.X.Y.Z\build\OctoPack.targets” to “$(ProjectDir)\Deployment\OctoPack.targets” Figure 5 shows this step.
Figure 5.
In file: “OctoPack.targets” inside “Deployment” folder, we need to modify some fields and add few others.
The first two fields we need to modify are those that point to the Octopus libraries to execute the specified tasks. Figure 6 show it.
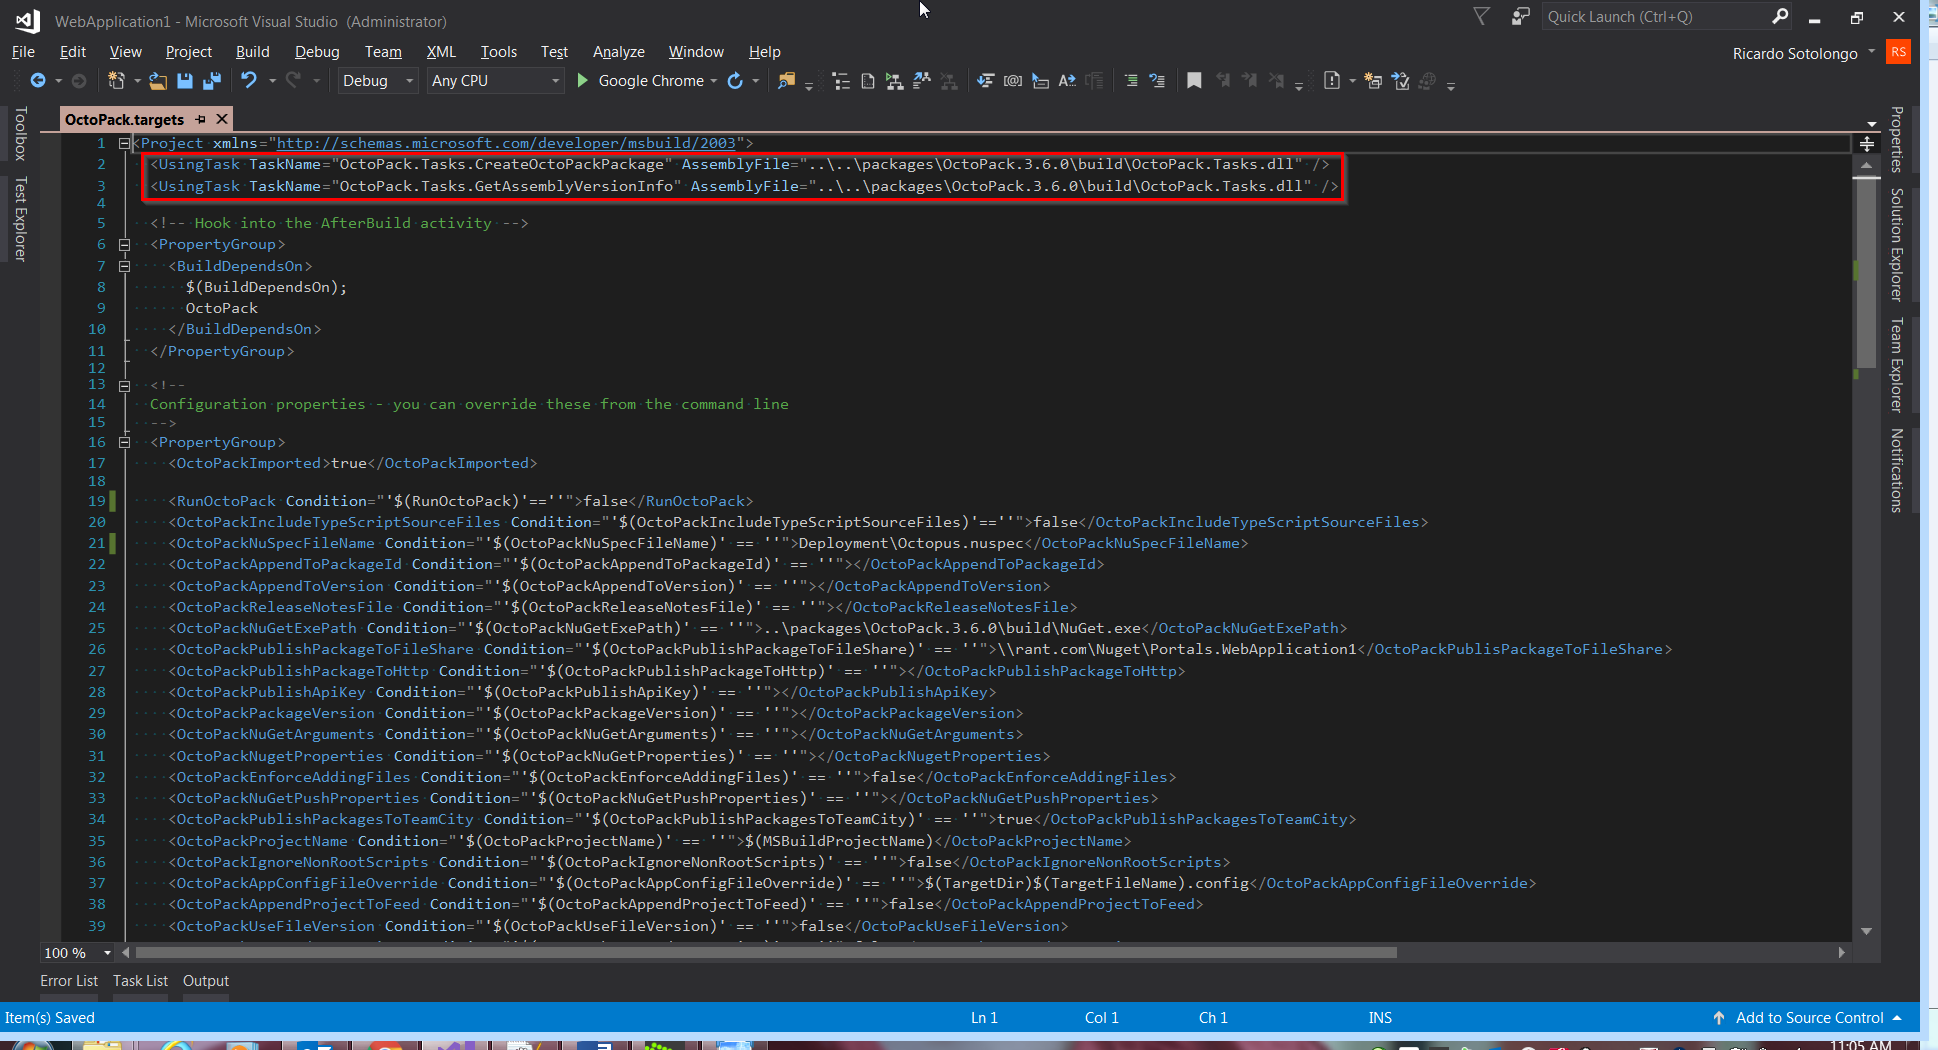
Figure 6.
Because we have moved the targets file we need to update those paths to the libraries inside the package folder. Because are inside the “Deployment” folder we need go up two levels until solution folder where “package” folder is. Notice that in every update of the “OctoPack” package, we need to update these paths.
After, we need to specify the value of the “OctoPackNuGetExePath” I like to use what is included in the package being used because Octopus use a custom-made version of NuGet.exe, so is better to use what is included in the package, for that reason: “..\packages\OctoPack.3.6.0\build\NuGet.exe” is a good value (notice that is depends of the package version too and we go up only one level because this is executed from the project root folder). Last variable to modify here is “OctoPackPublishPackageToFileShare” that should point into the shared directory where package will be copied to be deployed to Octopus. We normally use “\rant.com\Nuget”, so “\rant.com\Nuget\Portals.WebApplication1” is a good value for it. Figure 7 show the modifications.
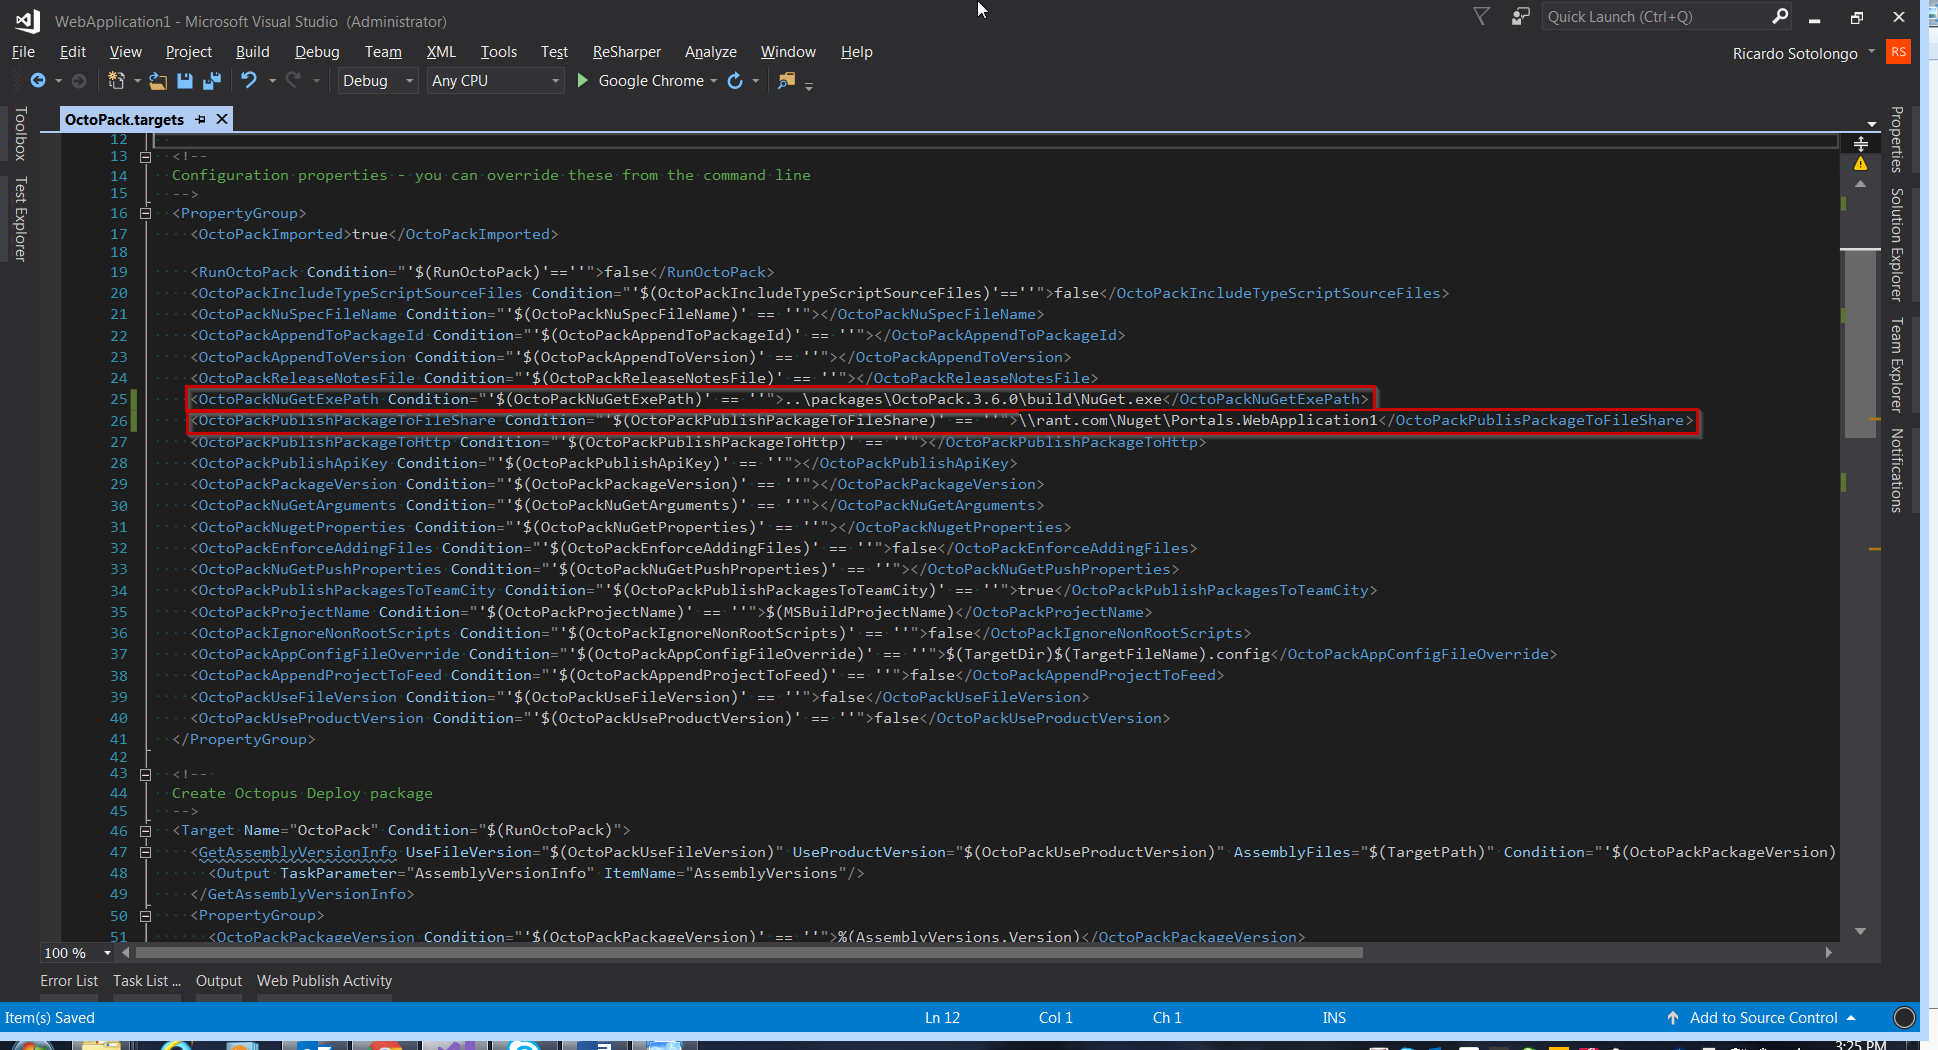
Figure 7.
Now what we need to do is configure the project to execute the task once is build. Remember the line deleted in figure 4? We need to add a line there as is shown in figure 8.
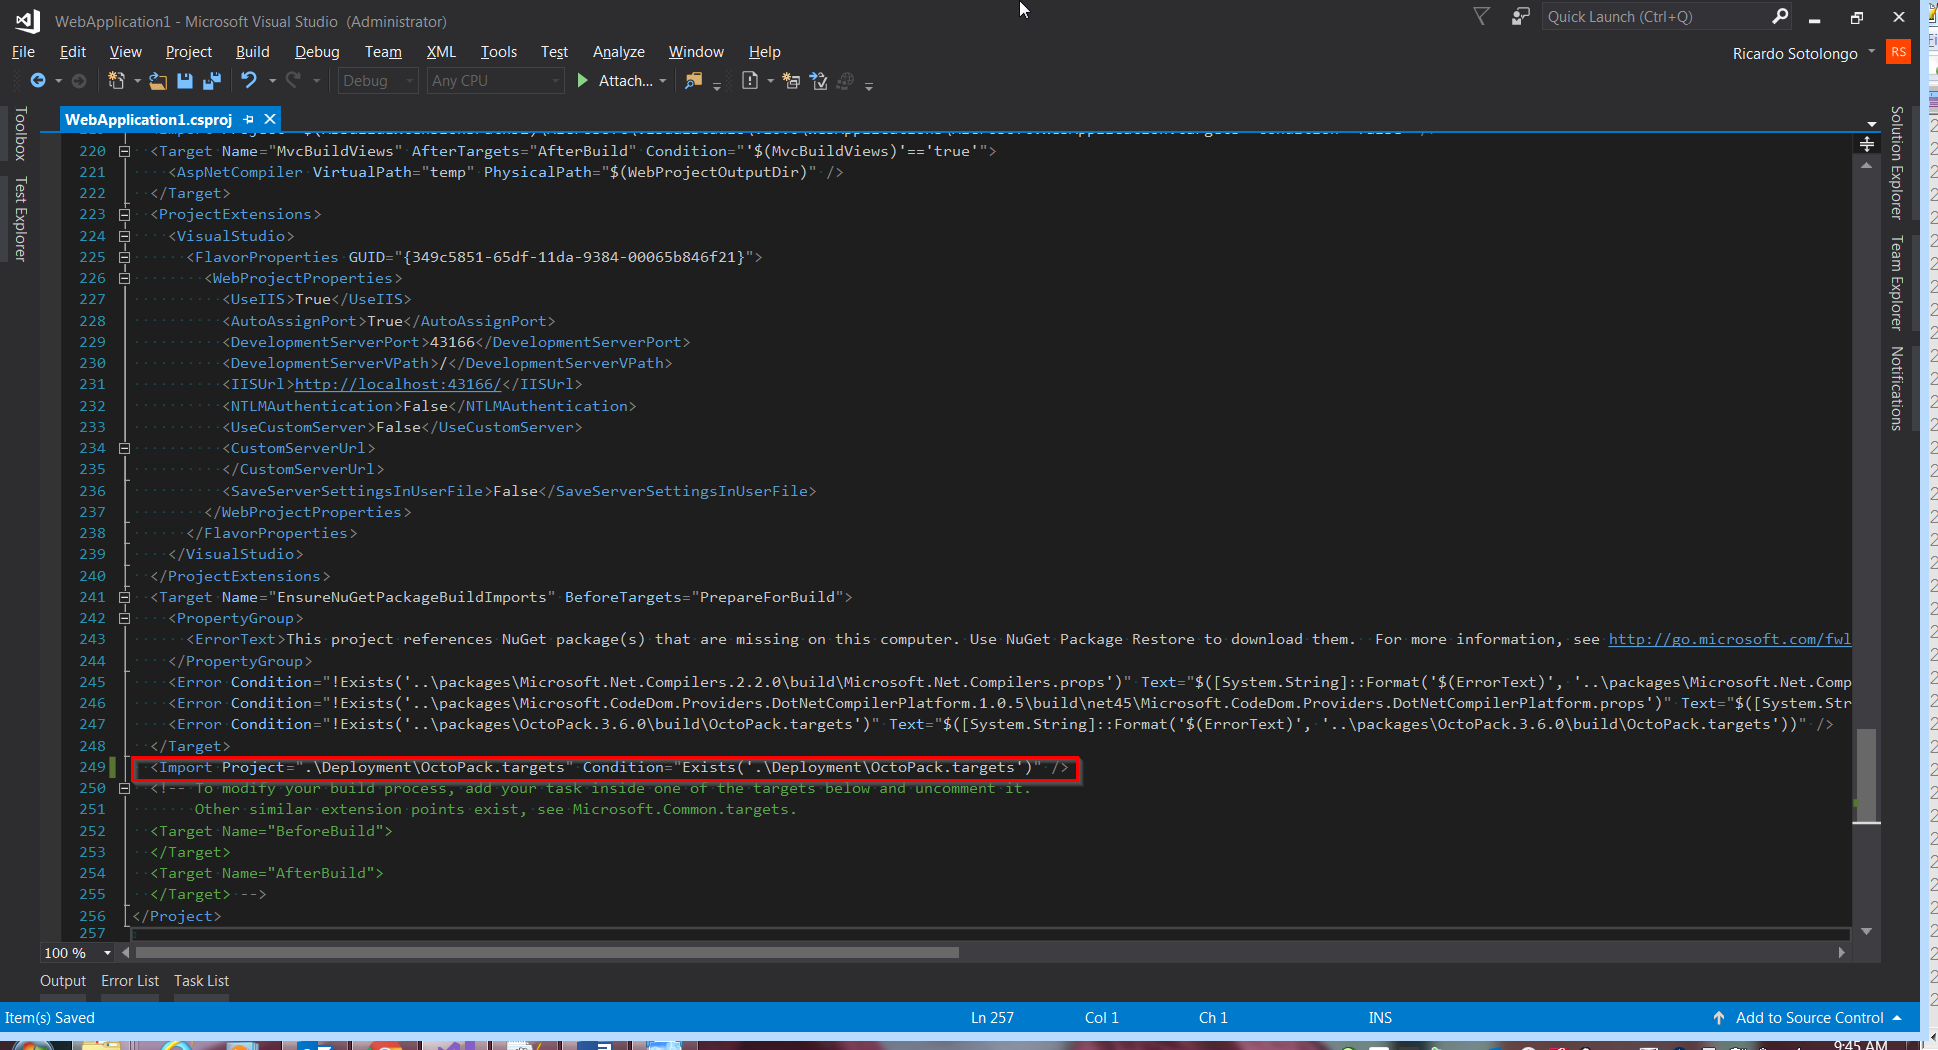
Figure 8.
|
|
Once this line is added we can build the solution but “\rant.com\Nuget\Portals.WebApplication1” continues being empty. Why? Because we need to change the value of variable “RunOctoPack” to “true” as figure 9 shows.
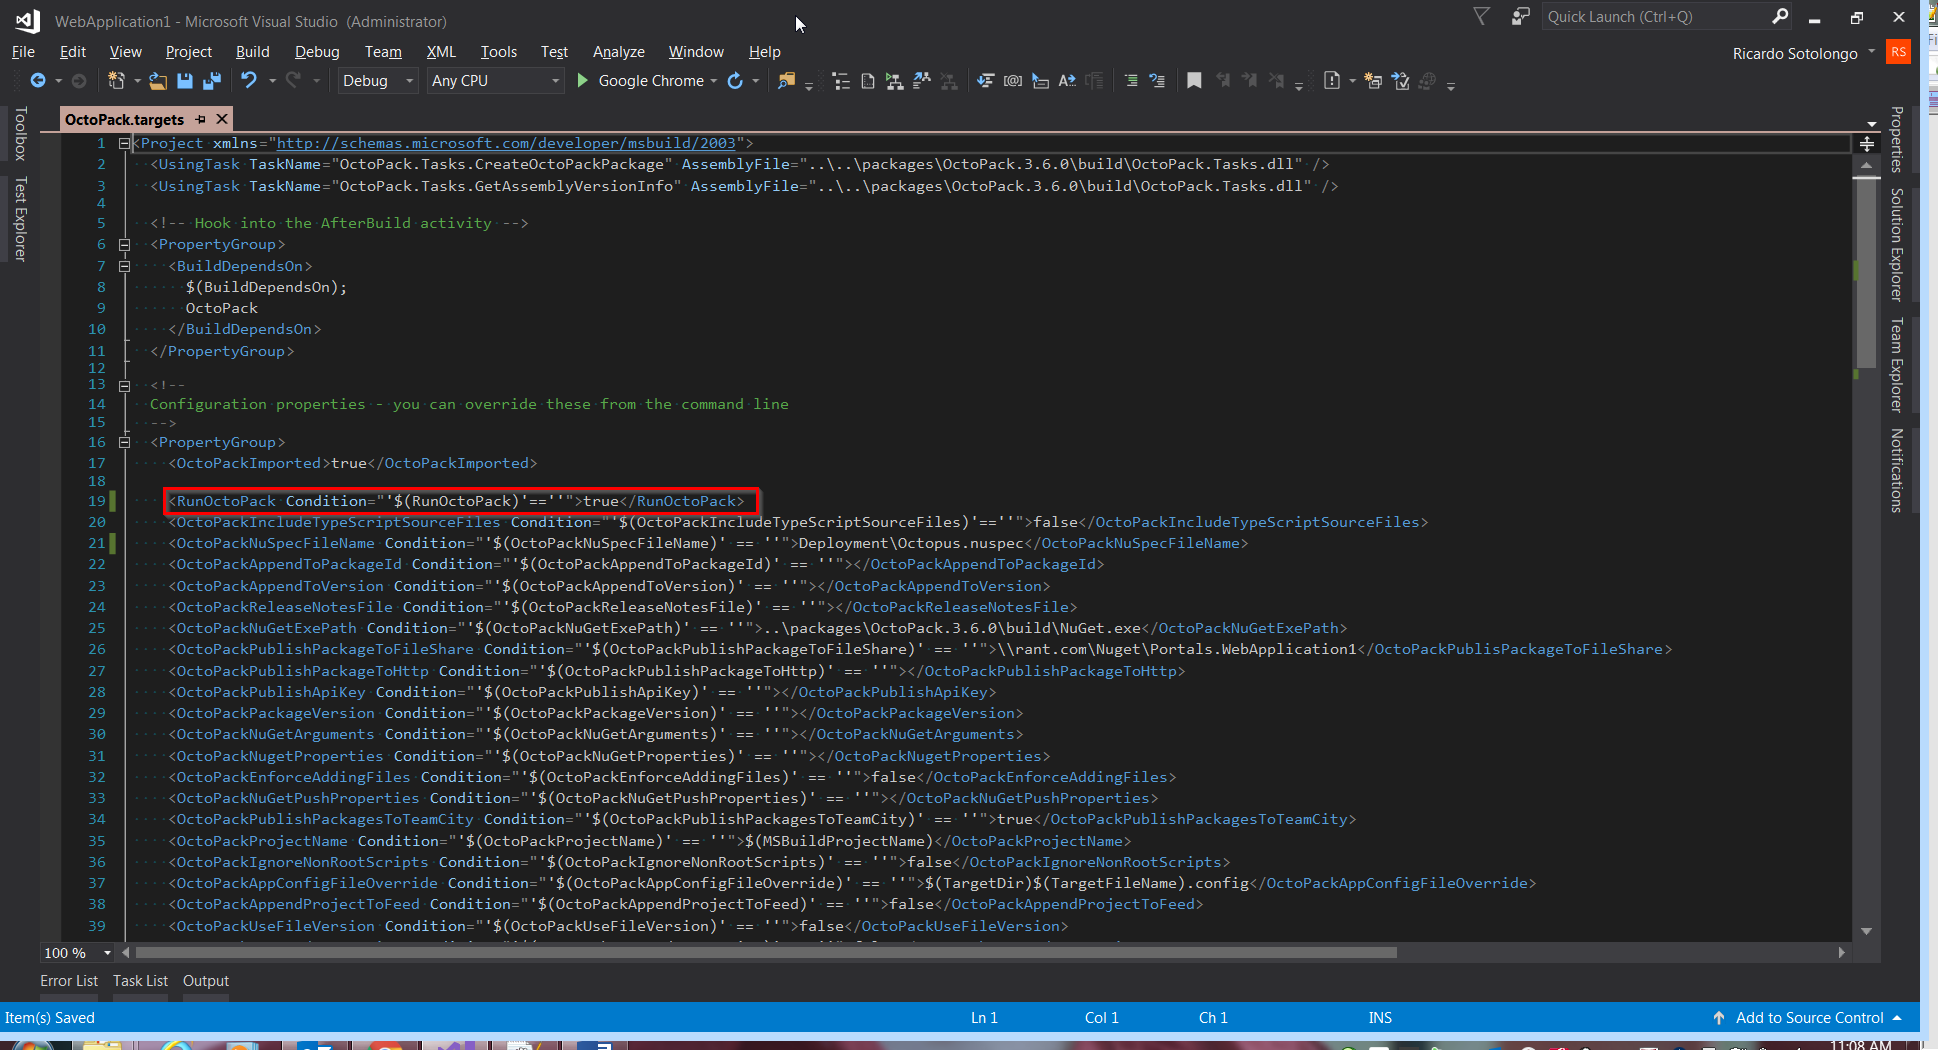
Figure 9.
Now, if we build again the solution we obtain the results shown in figure 10 and a package file in “\rant.com\Nuget\Portals.WebApplication1” as figure 11 shows.
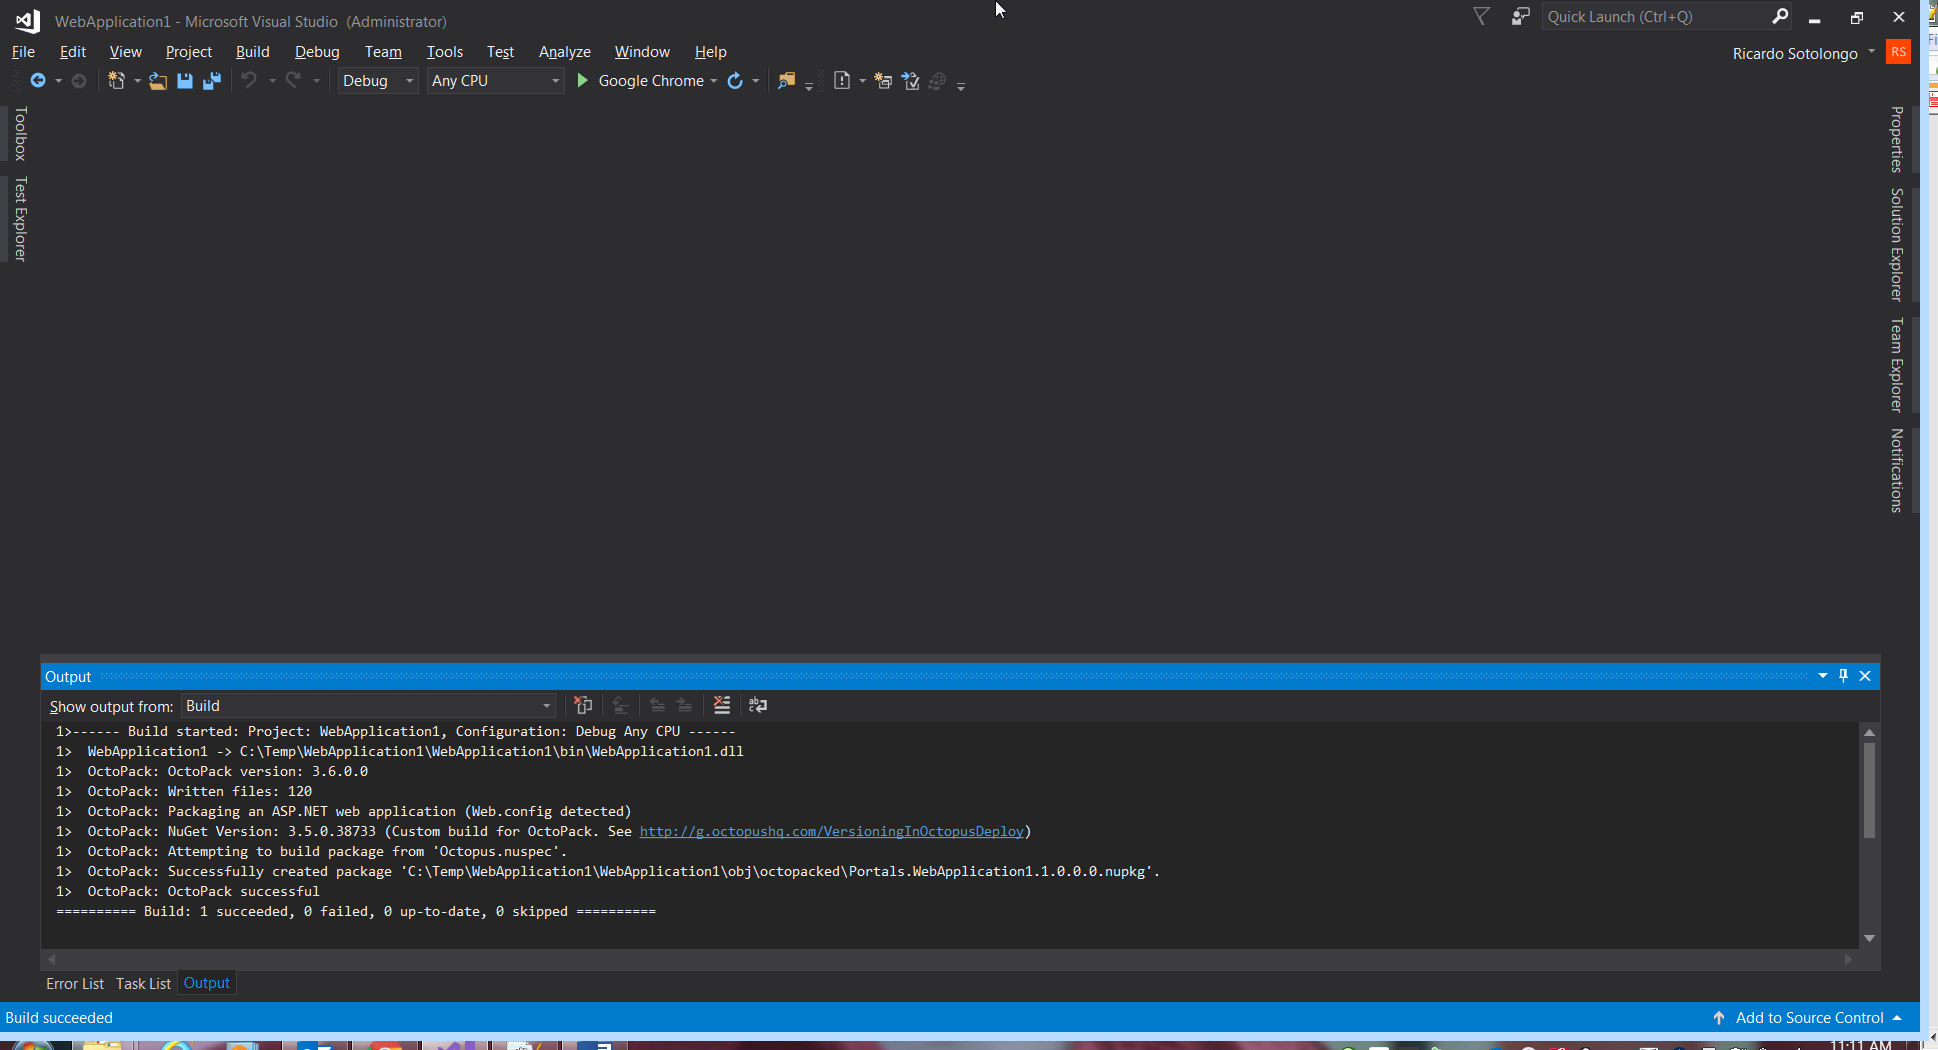
Figure 10.
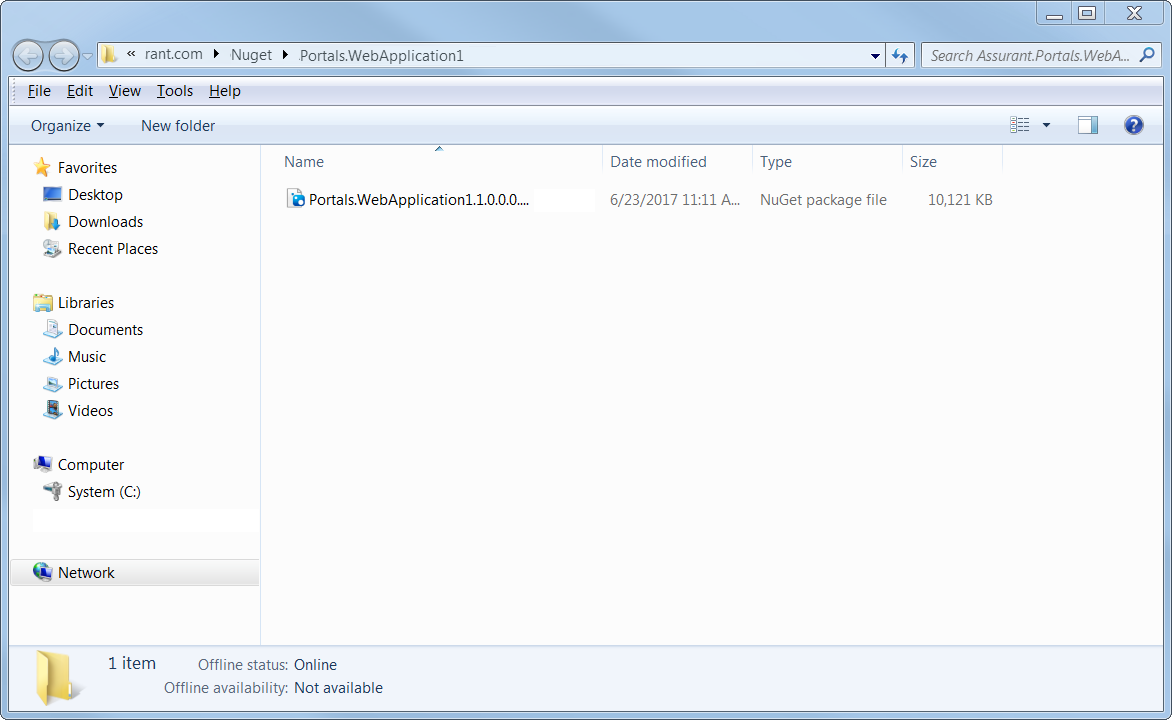
Figure 11.
So far so good except that no matter how many times we build, the package generated will be the same version: “1.0.0.0” that is not good for automatic Octopus releases. So, let’s fix this opening the file “AssemblyInfo.cs” inside “Properties” project directory and change the “AssemblyVersion” attribute from “1.0.0.0” to “1.0.*” as is shown in figure 12.
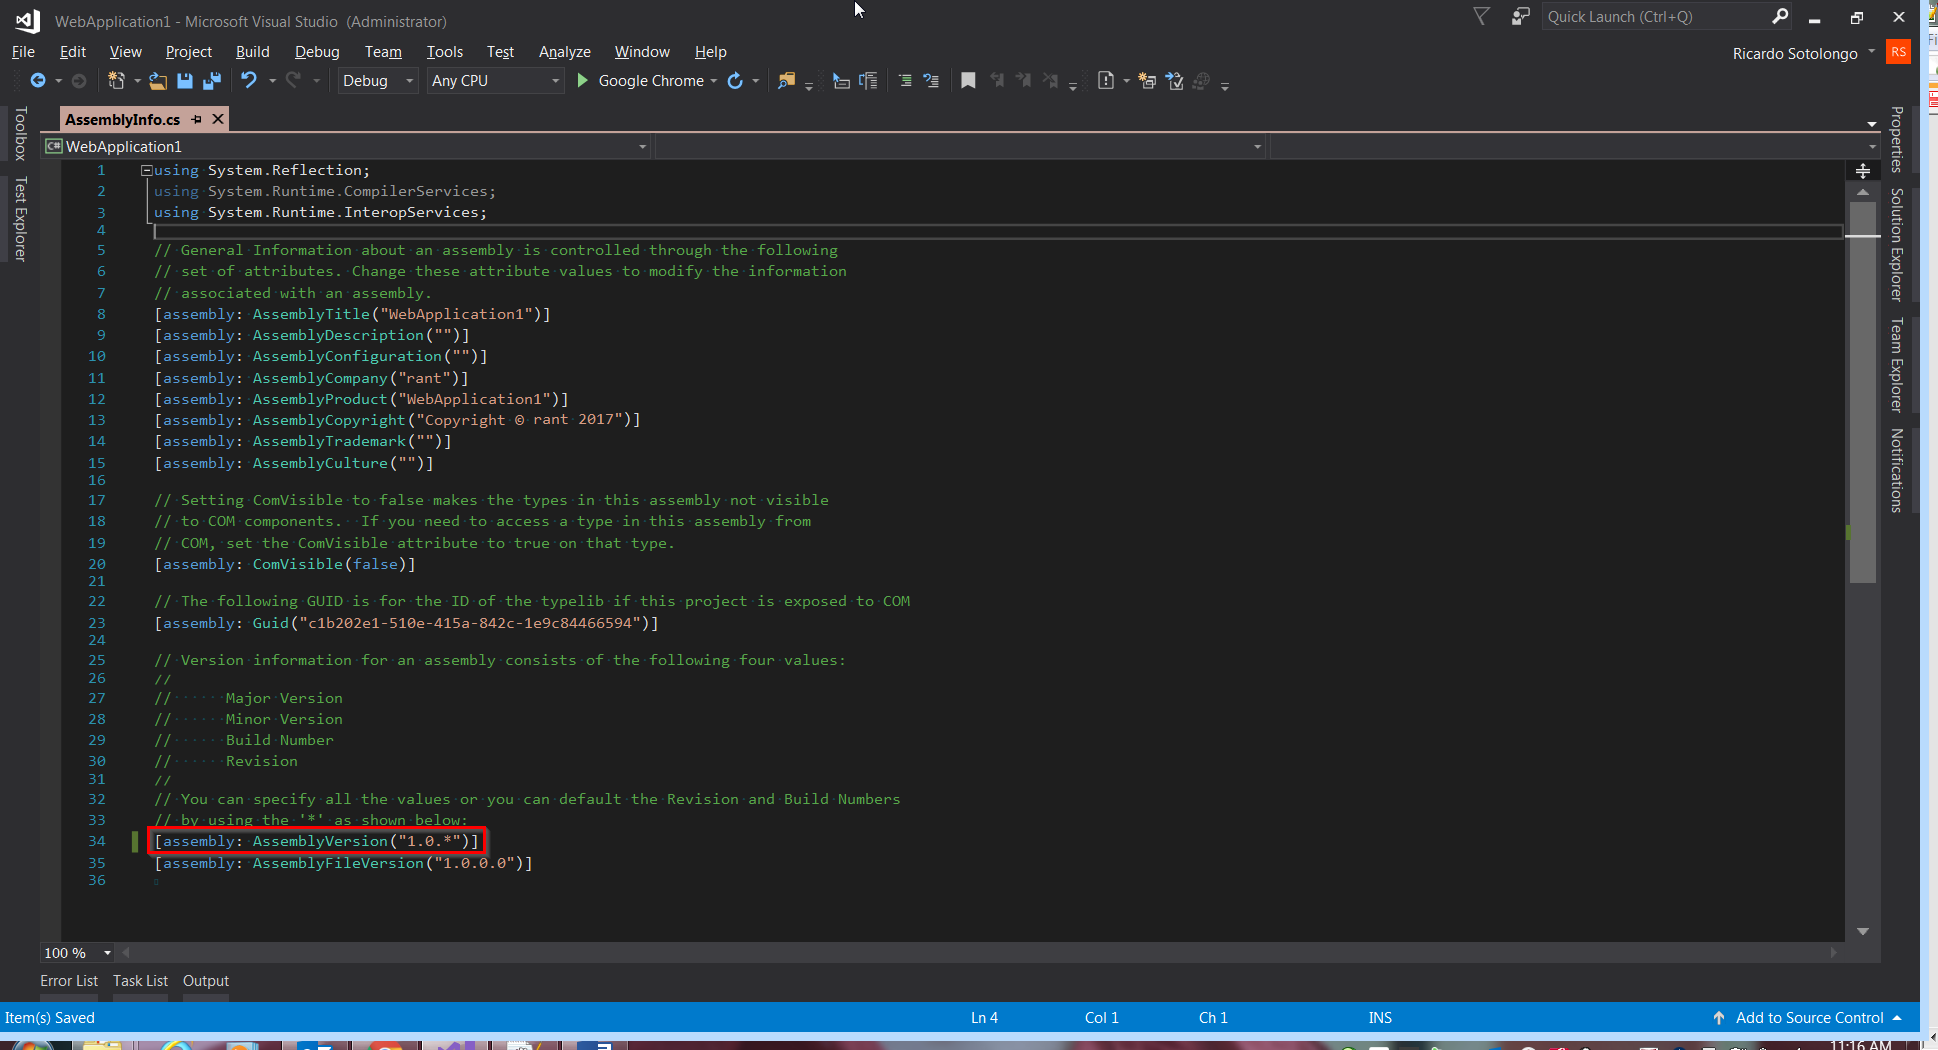
Figure 12.
Doing that we ensure that every build will have a different assembly version, meaning different Octopus release version that we will configure in the following steps. Please see figure 13 and 14 to notice the changes.
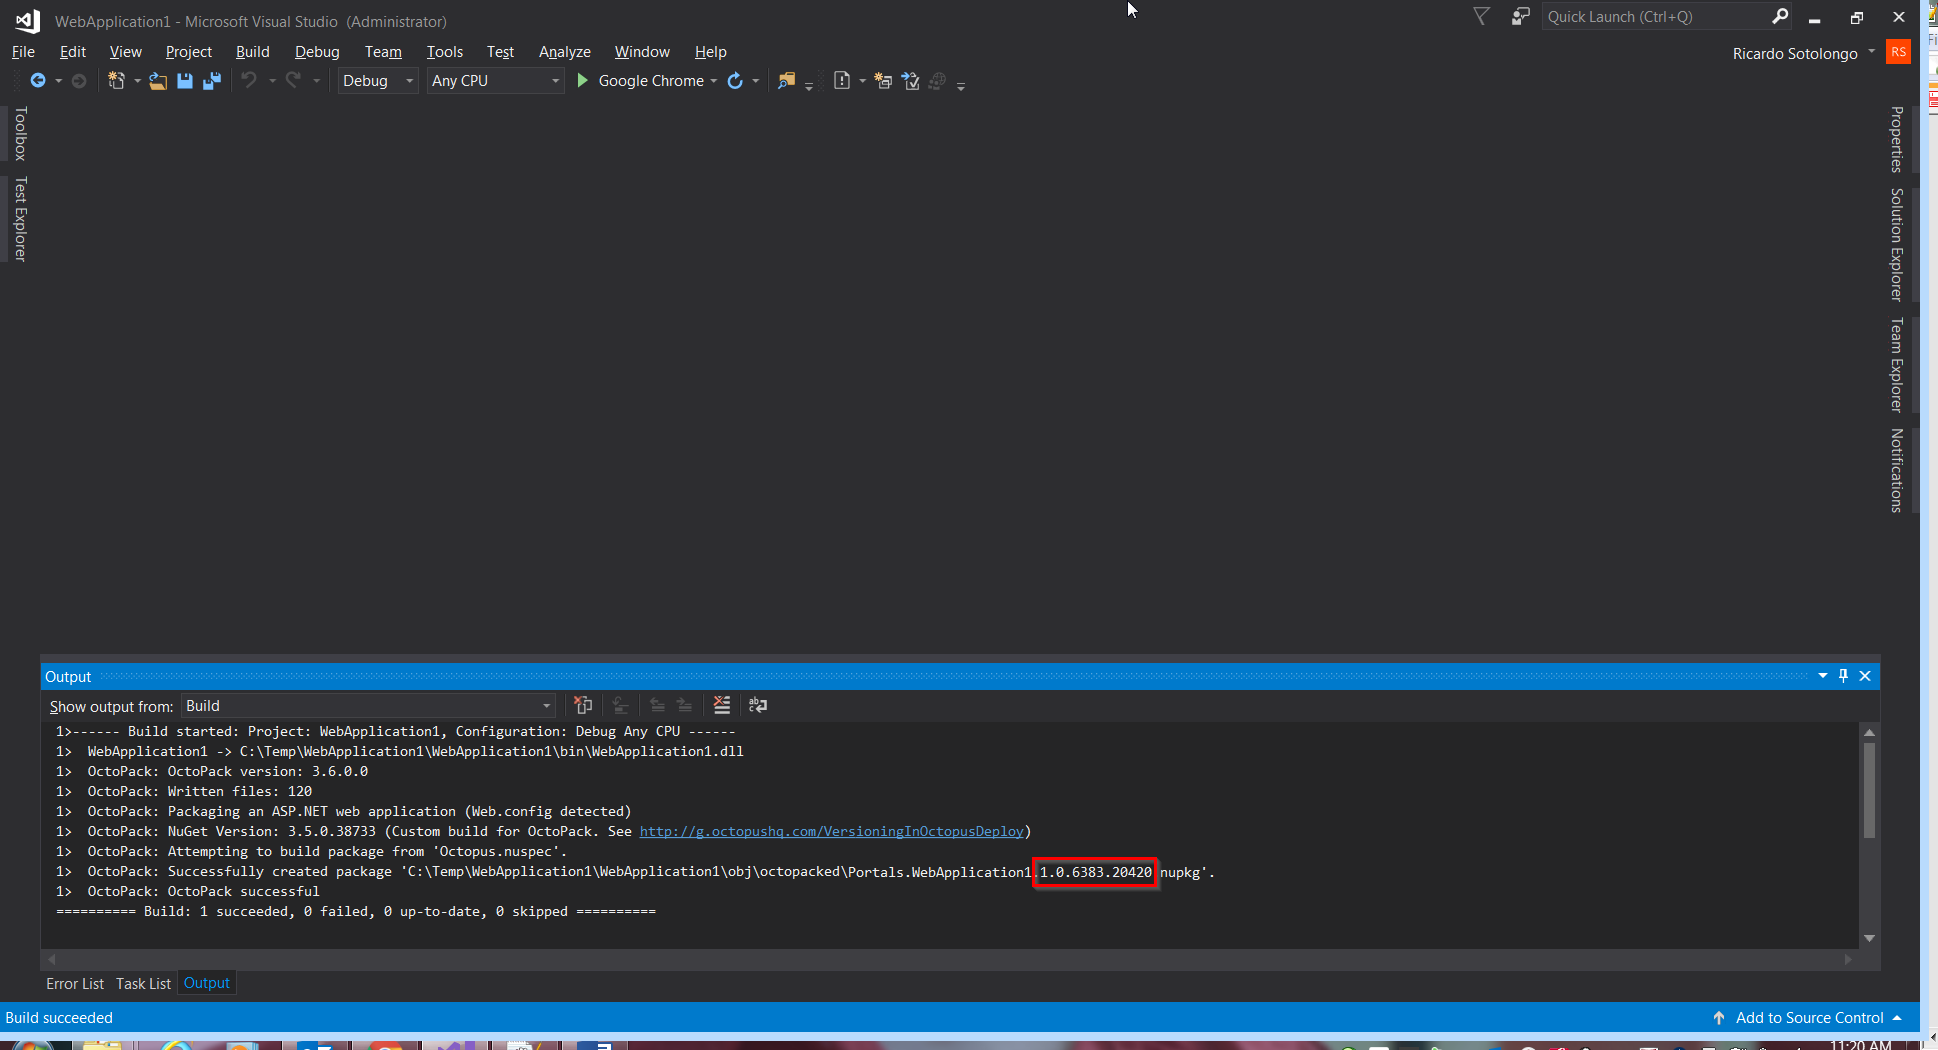
Figure 13.
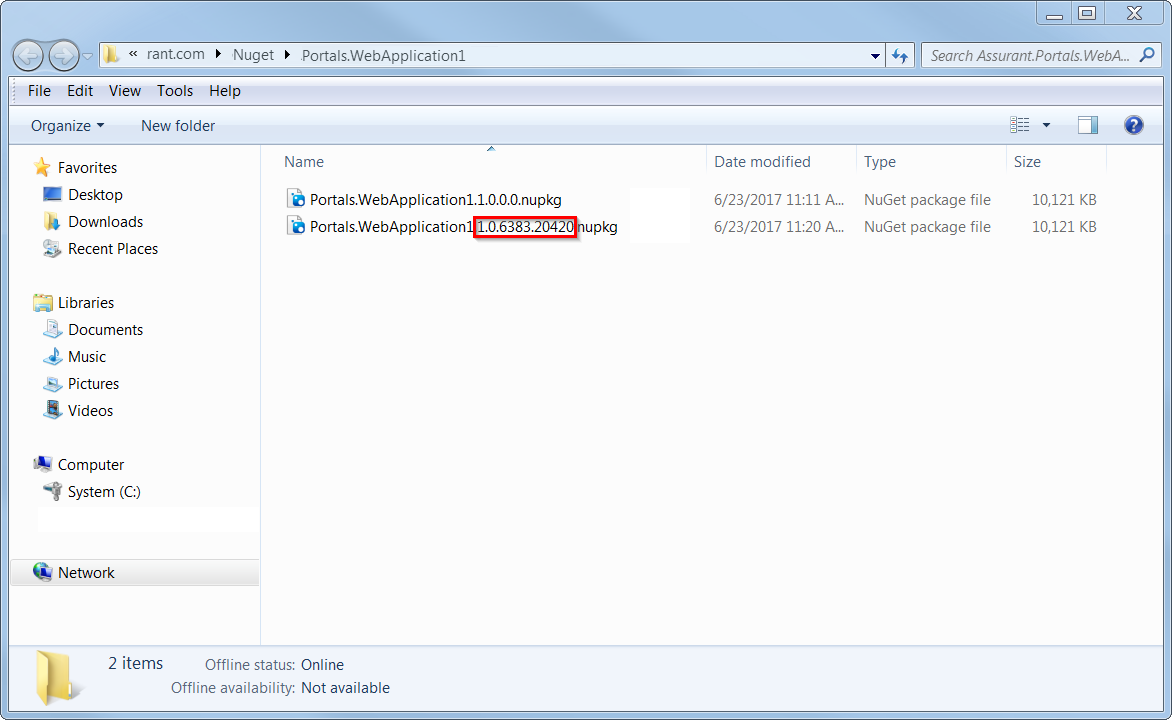
Figure 14.
Let’s go again to file: “OctoPack.targets” and add the section highlighted in figure 15.
This region is totally new section that we should add in order to configure (not execute) automatic releases to Octopus. The code is:
|
|
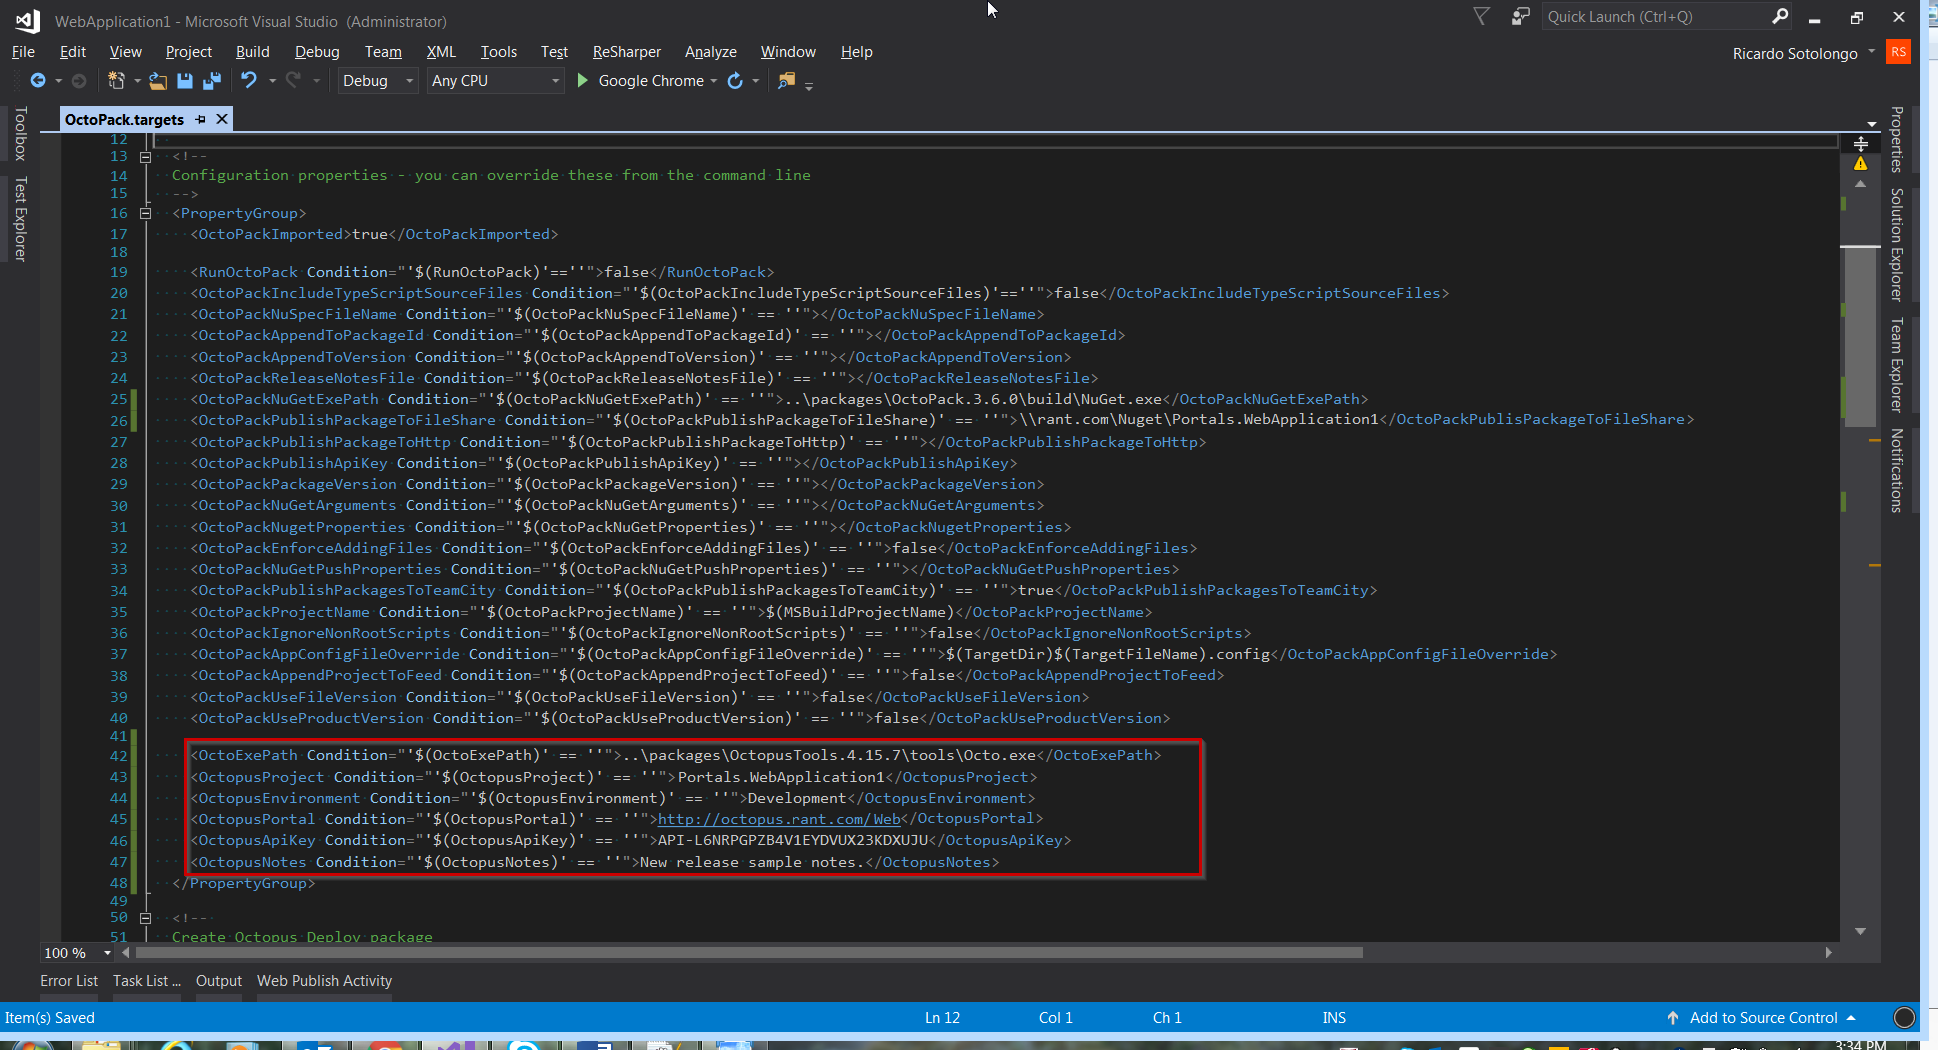
Figure 15.
Because this is executed from the project root folder, we need to go up only one level. The “OctoExePath” is the only one variable dependent of the path of the “OctopusTools” package. The variables “OctopusProject”, “OctopusEnvironment”, “OctopusPortal”, and “OctopusApiKey” depends of your project Octopus configuration but what I can say here is that normally we only release to “Development” environment and I’ll talk about the API variable after in this document. Finally, we specify the value for the release notes in the variable “OctopusNotes” that normally are included in the email sent by Octopus server once a new release finished to be deployed.
Once again, that region is only for configure variables related with Octopus for create releases. To actually create the releases, we need to add the following lines to the end of that file. Figure 16 shows the results.
|
|
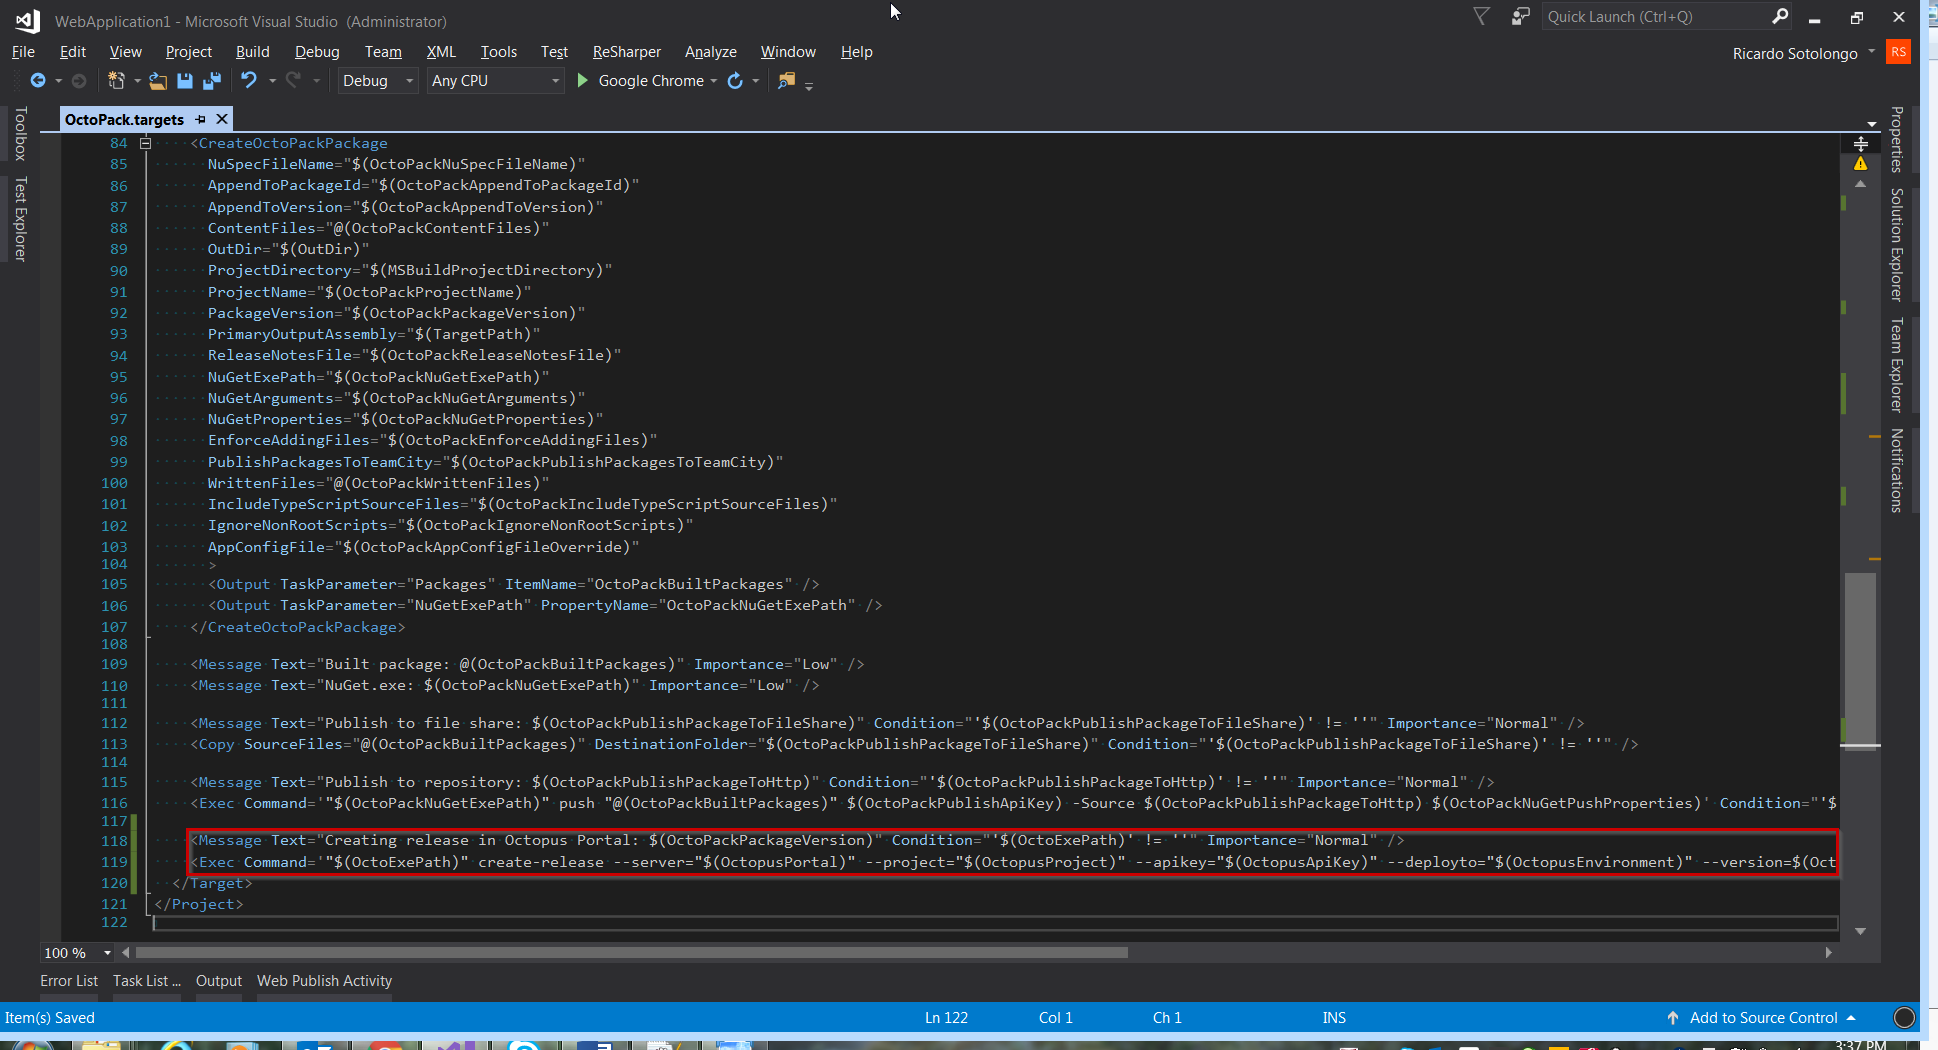
Figure 16.
Figure 17 show the build output, notice the highlighted section after the last message received in figure 10.
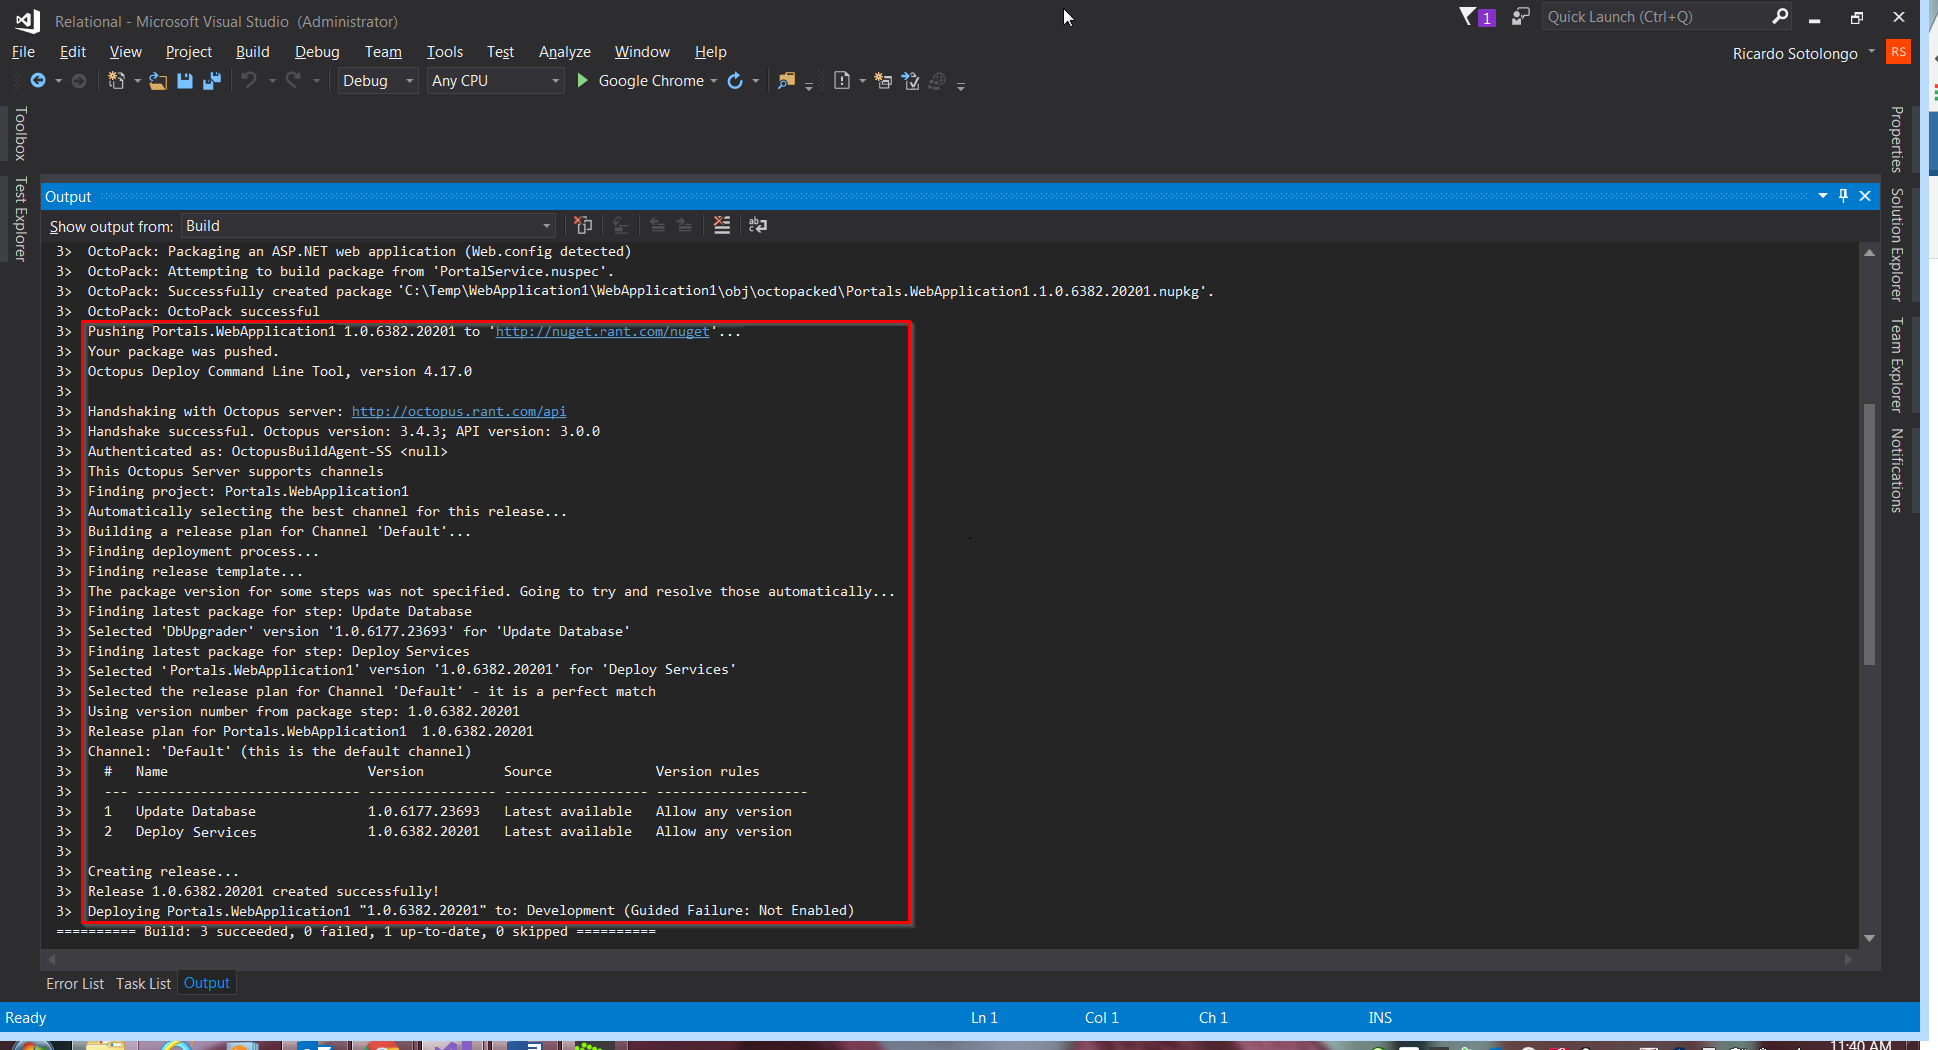
Figure 17.
If you open Octopus portal in your project after the build you can get something like what is shown in figure 18.
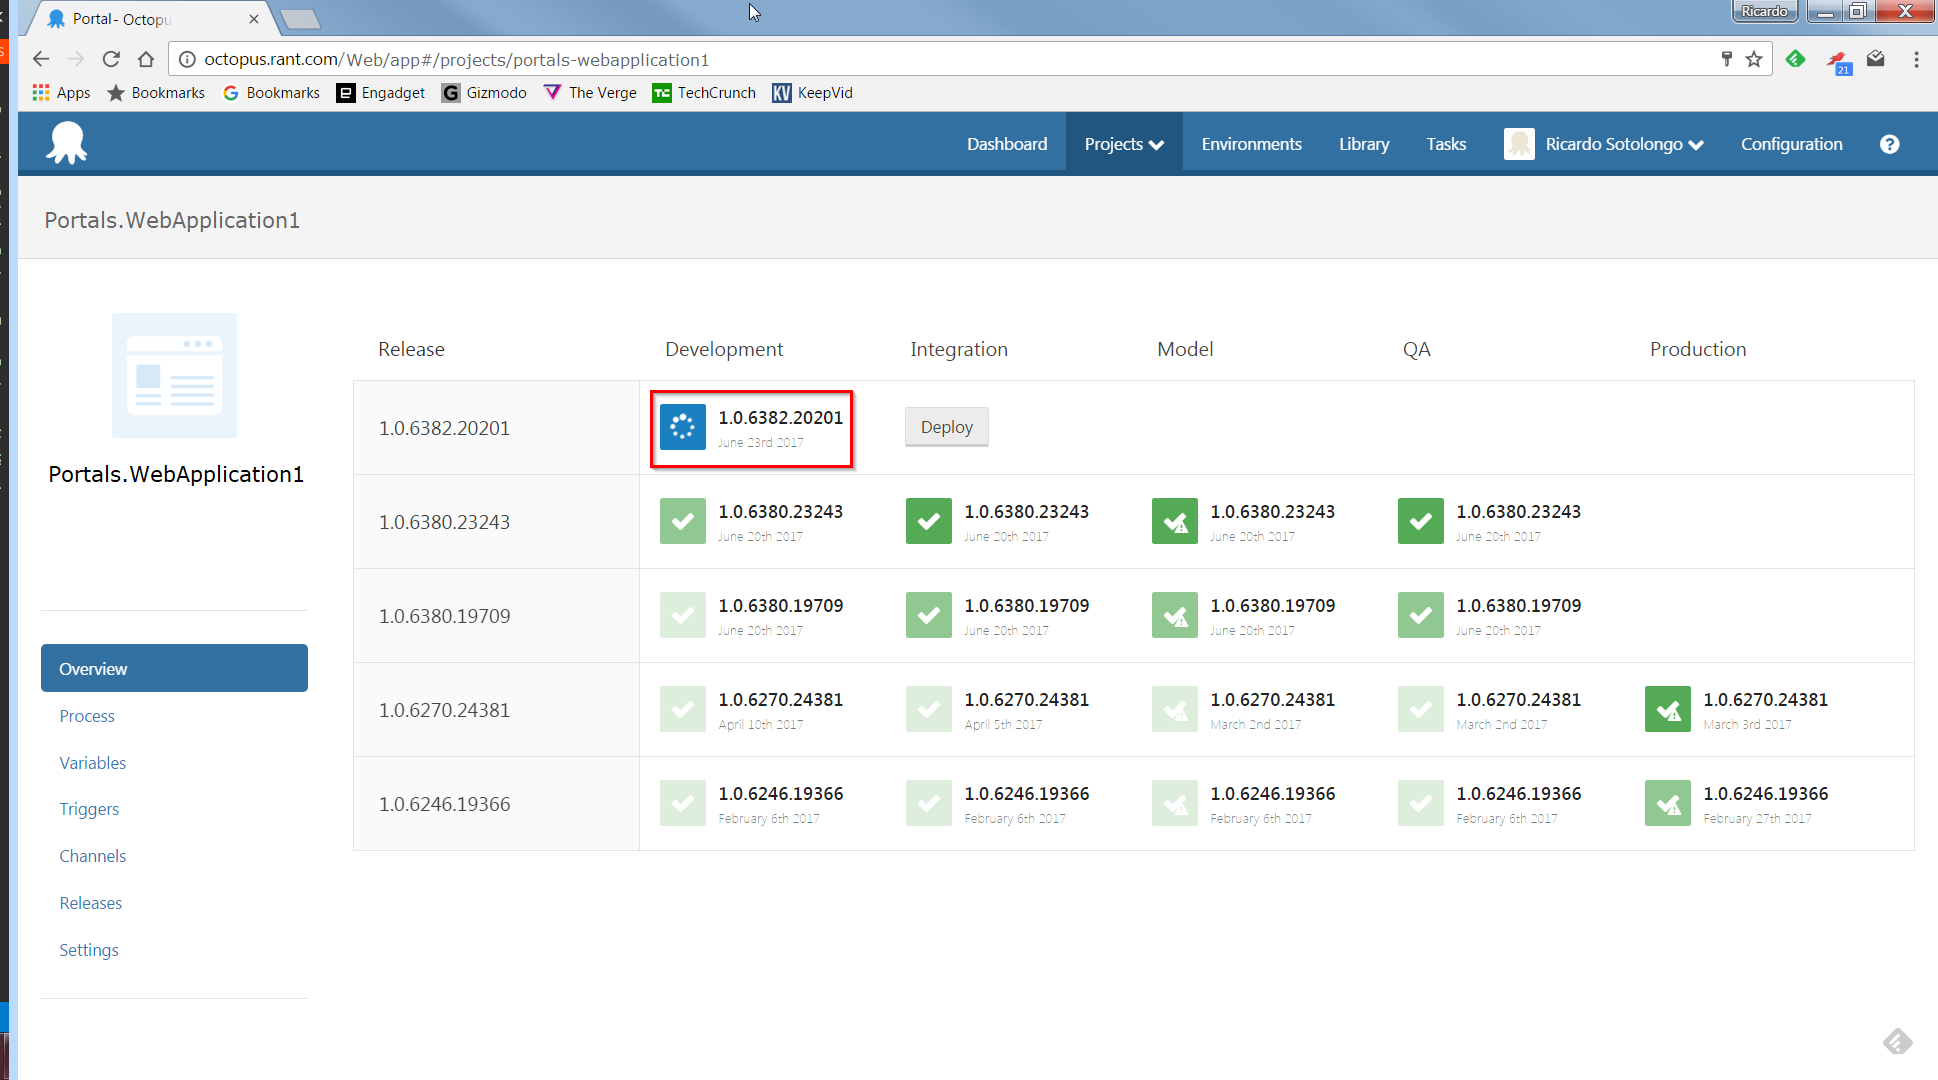
Figure 18.
So, with just a change of a word: “false” by “true” in variable “RunOctoPack” we achieved many results: An Octopus package ready for be deployed and an Octopus release with product deployed in the specified environment. The risk here is leave that variable as true and/or check-in it as true and make a release in every build. That happens but usually is not what I like to do, so I pay double attention before check-in changes in this file.
Let’s talk now about packages update. Figure 19 show the updates available.
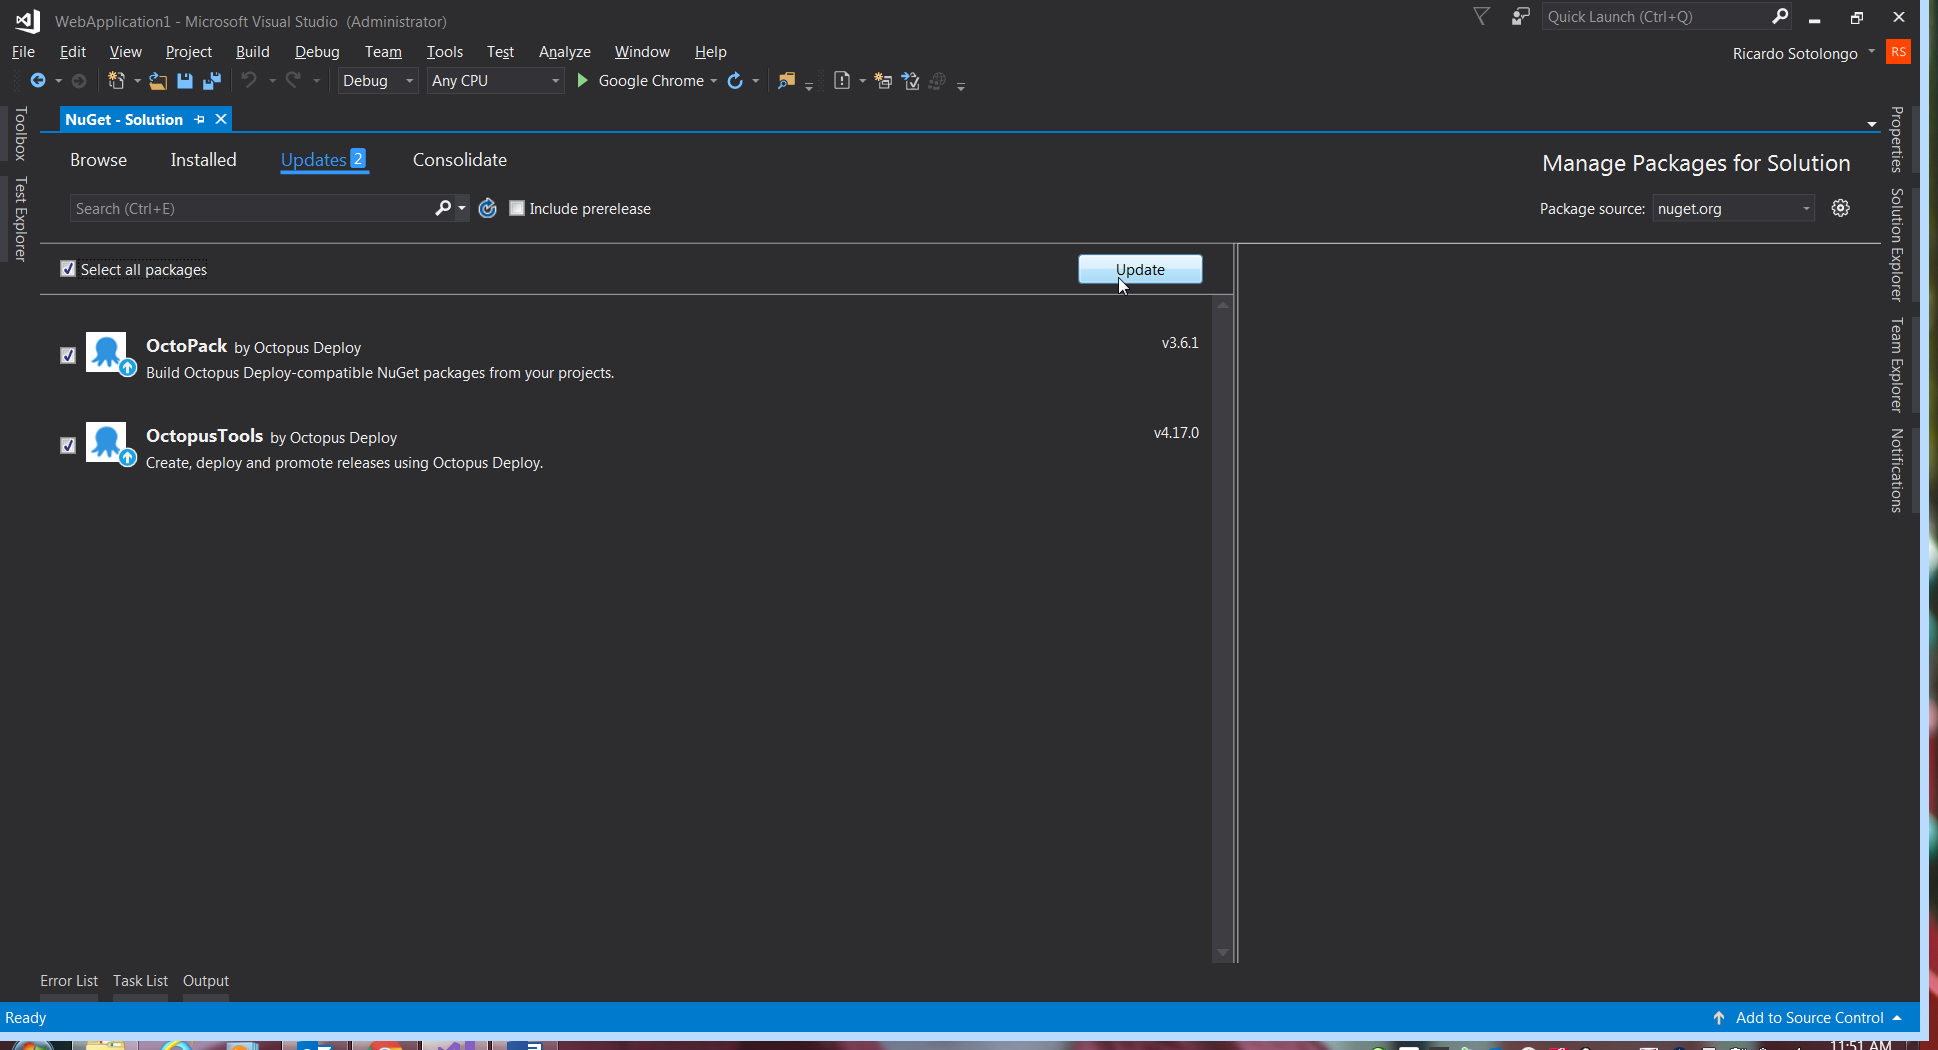
Figure 19.
After update both packages, Visual Studio deletes the old versions as Figure 20 shows.
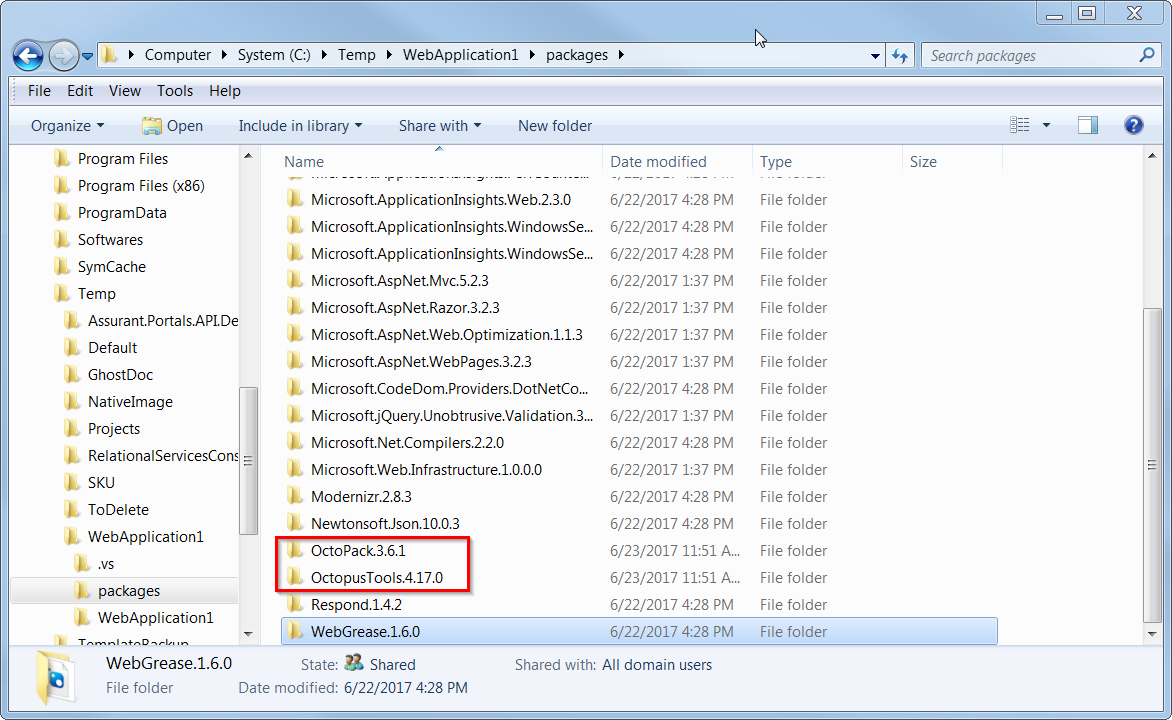
Figure 20.
Thanks that we are using the targets not from the package location but from inside project location, what we have to do is update all old version references to the new version references, meaning all “3.6.0” by “3.6.1” and all “4.15.7” by “4.17.0”. There are 3 places in “OctoPack.targets” for the first changes and only one place for the second change.
Figures 21 and 22 shows the respective places.
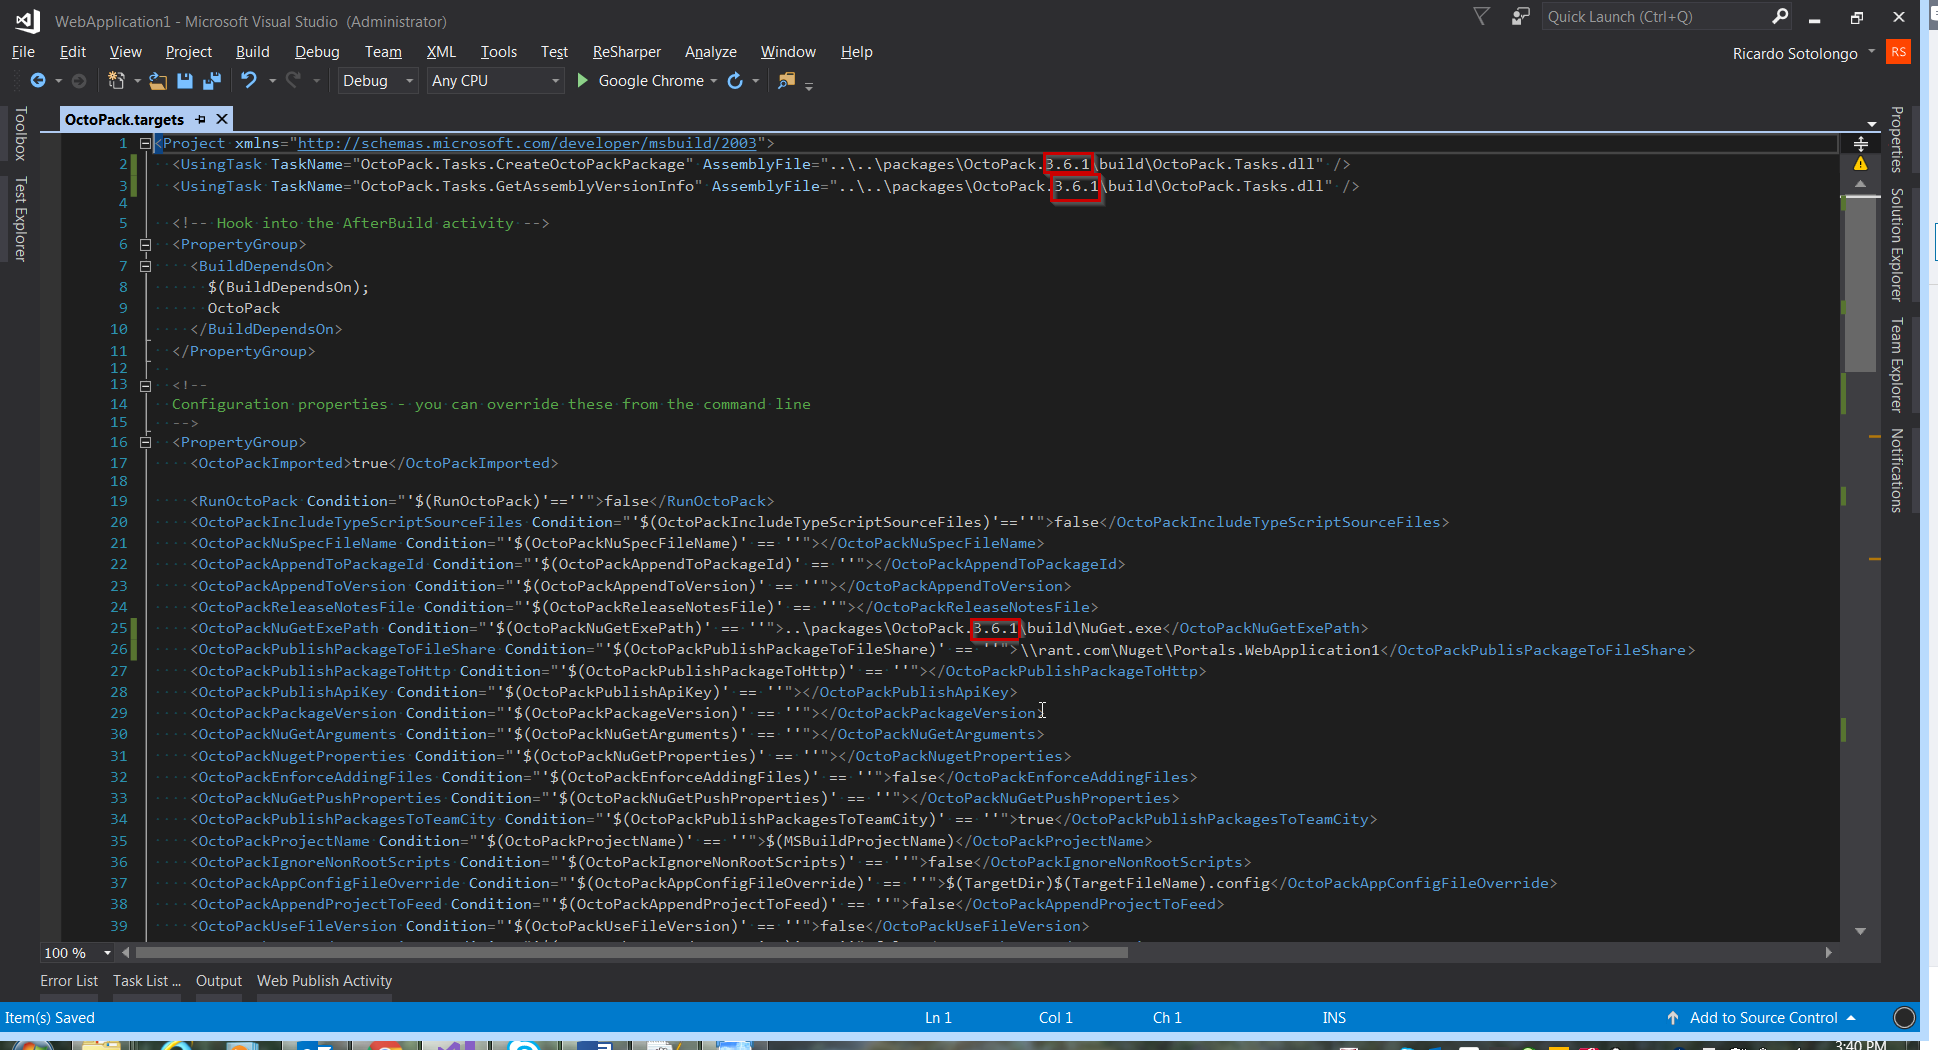
Figure 21.
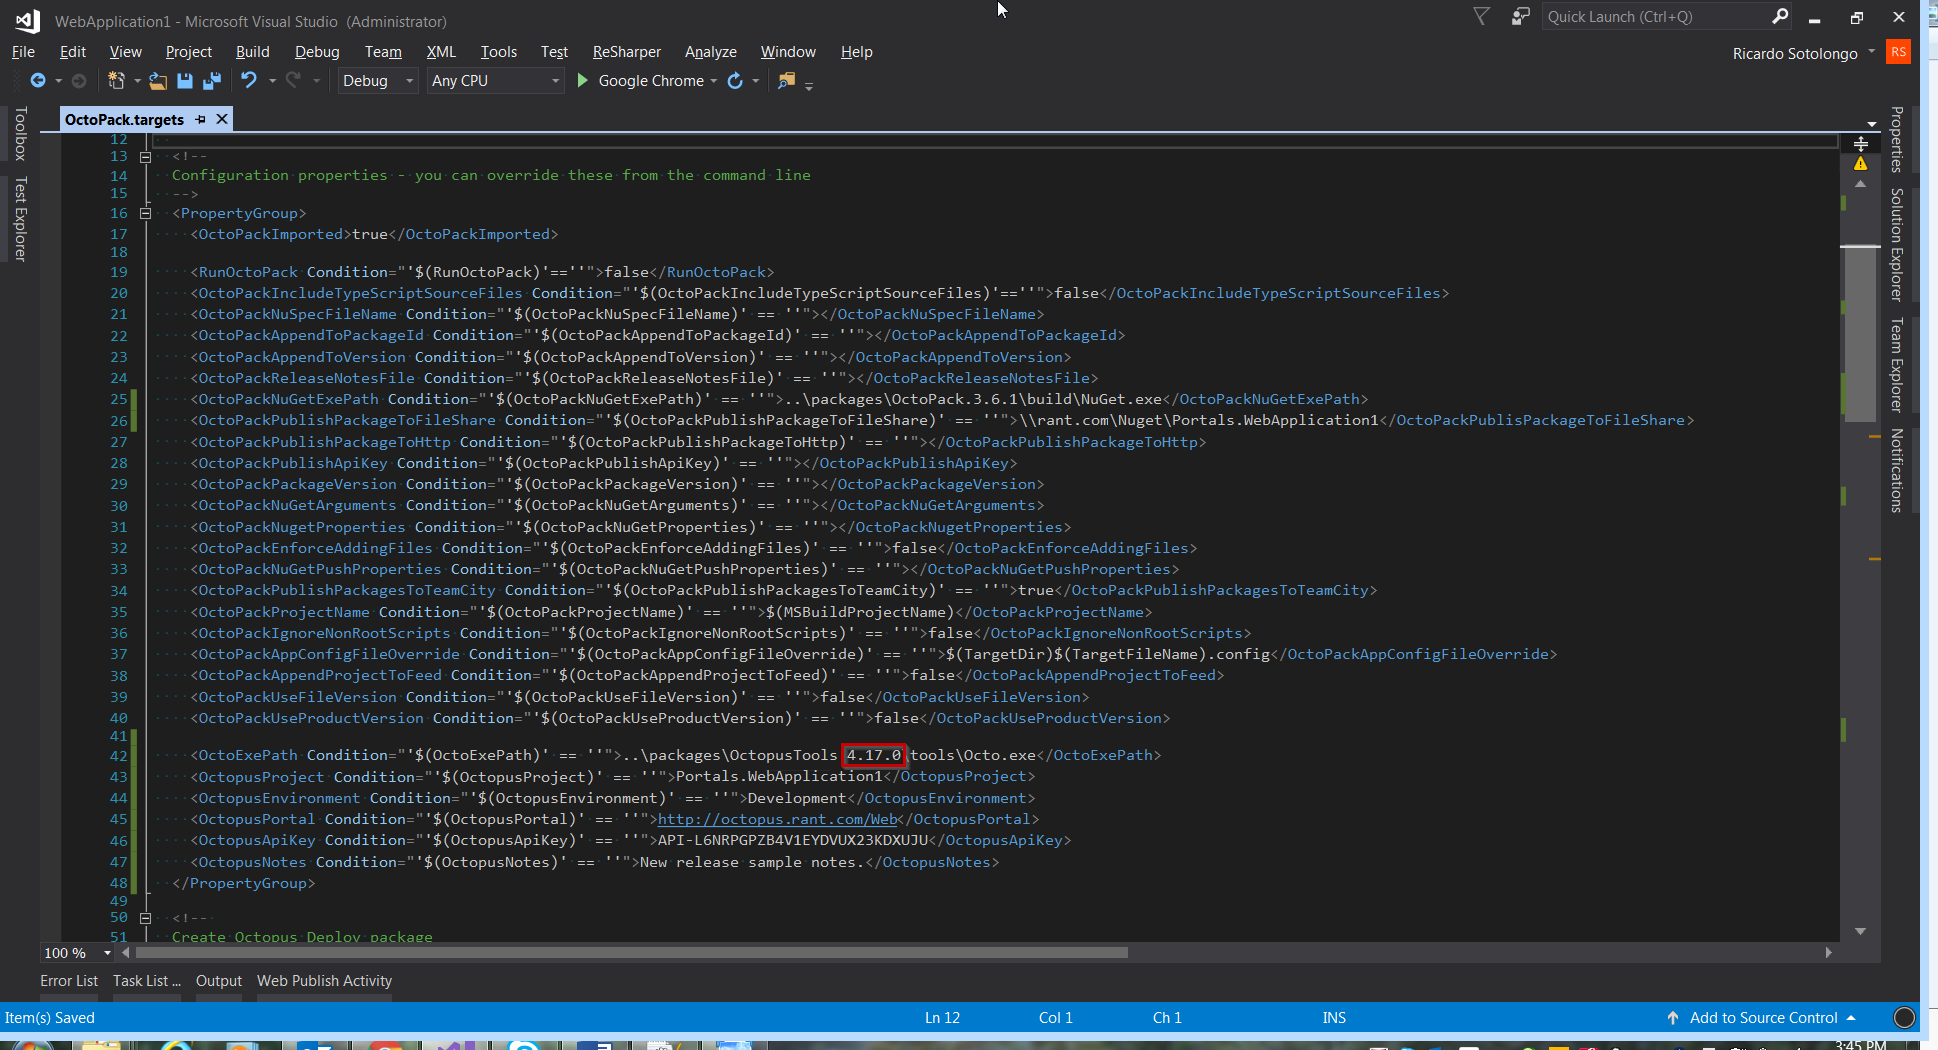
Figure 22.
One more thing, the API value for Octopus releases can be generated accessing to the Octopus portal…
…and follow the steps in figure 23 to figure 26.

Figure 23.
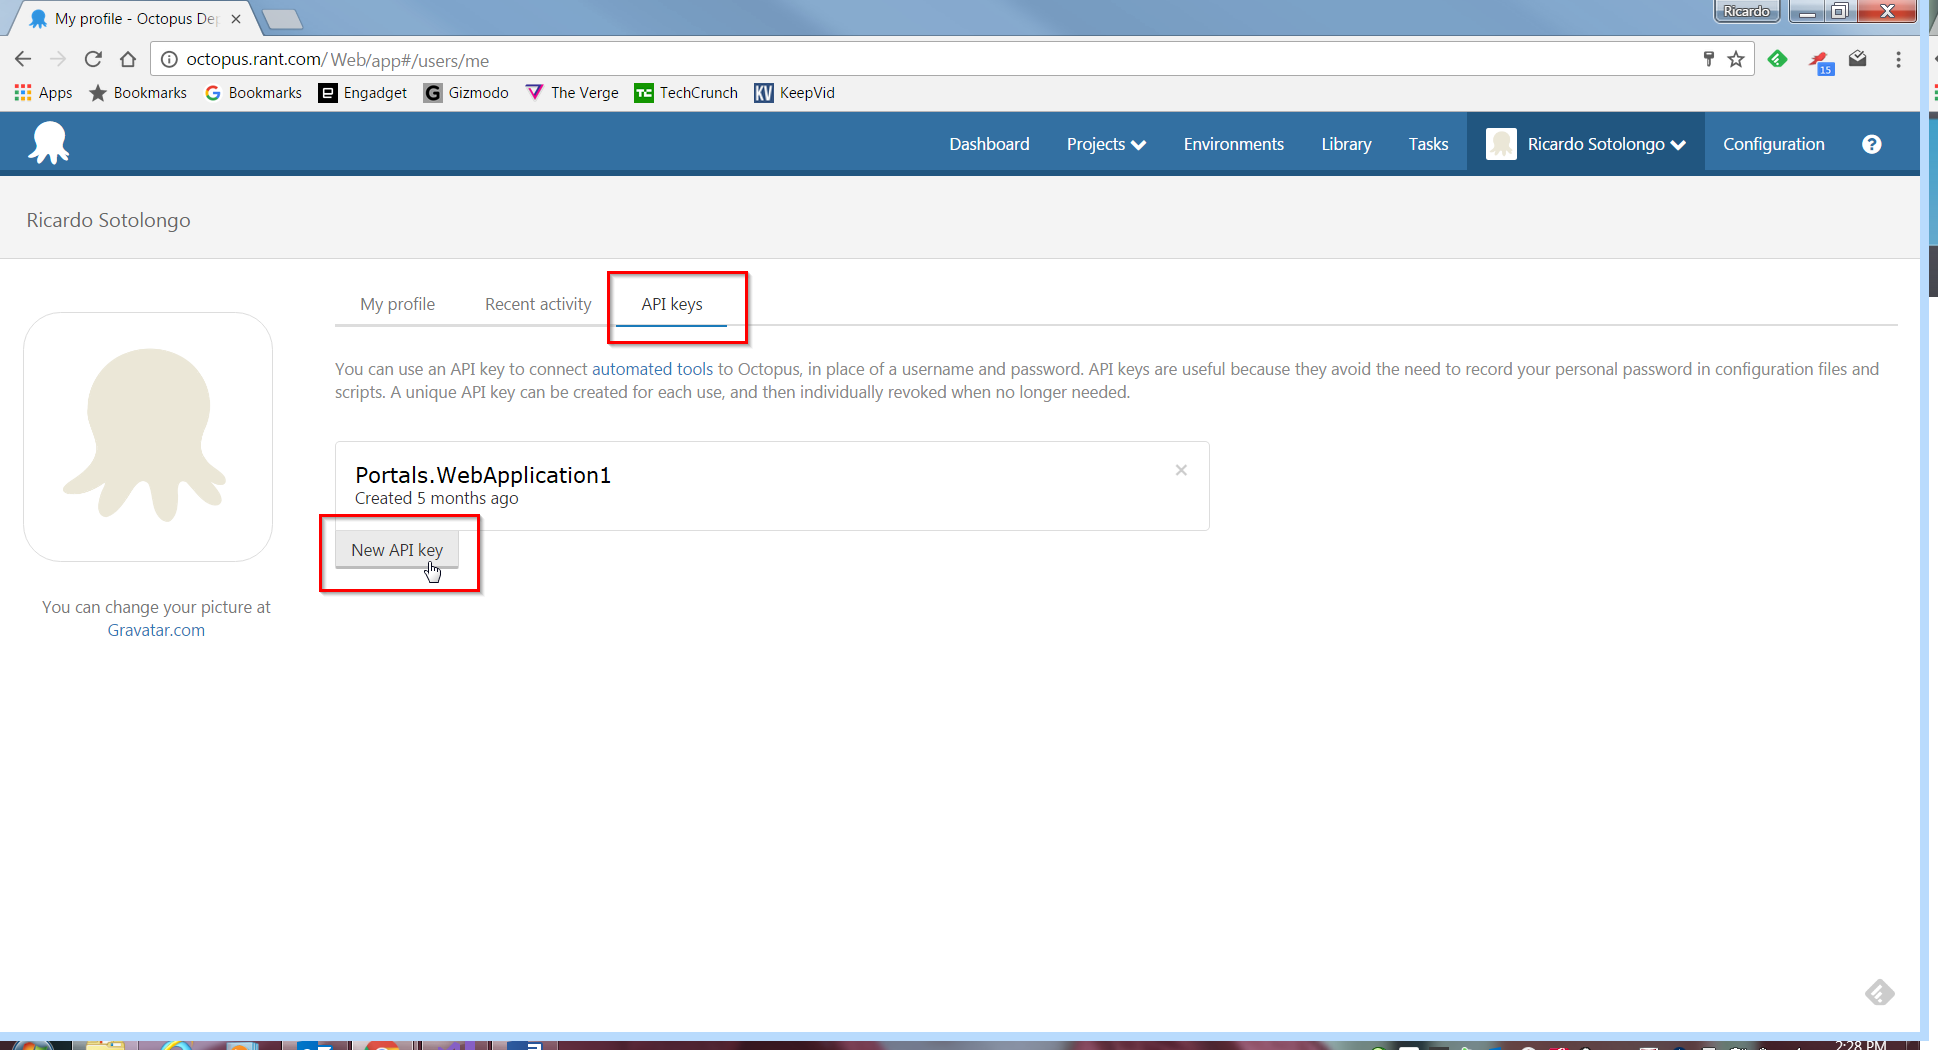
Figure 24.
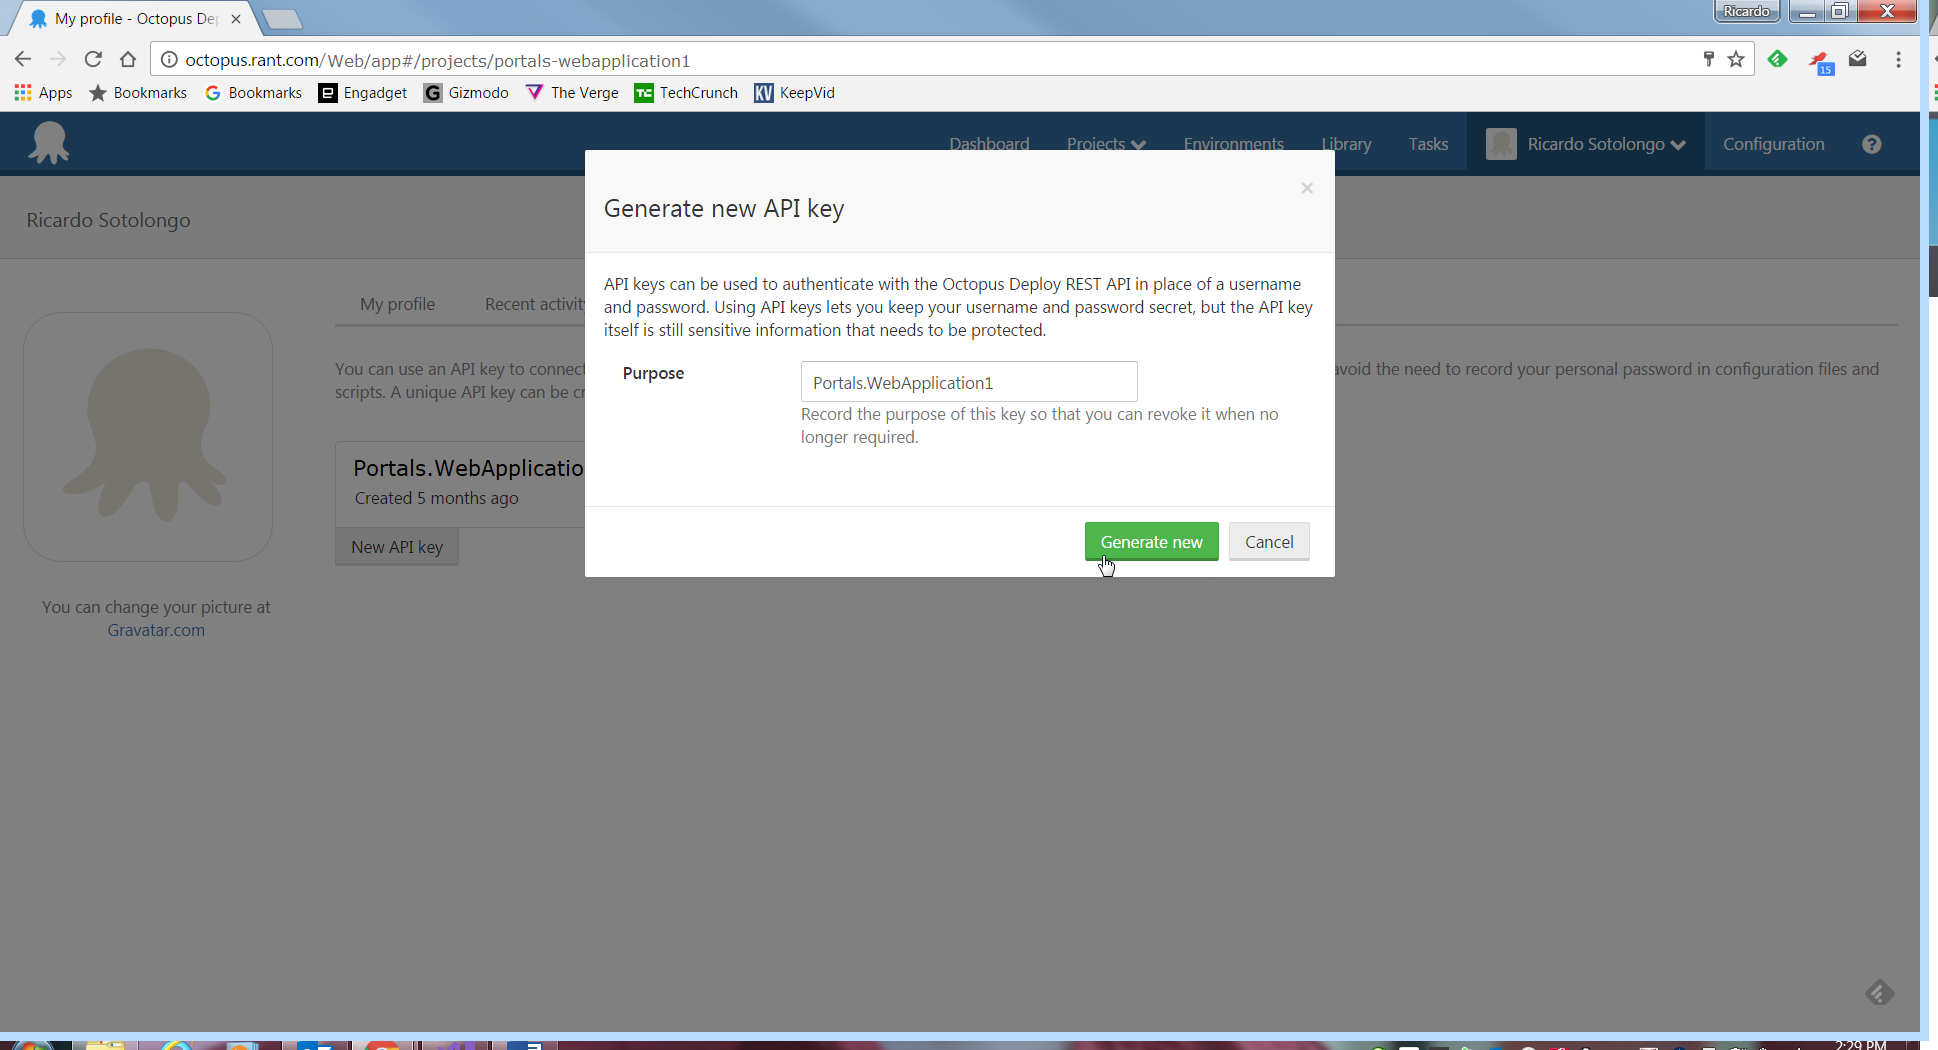
Figure 25.
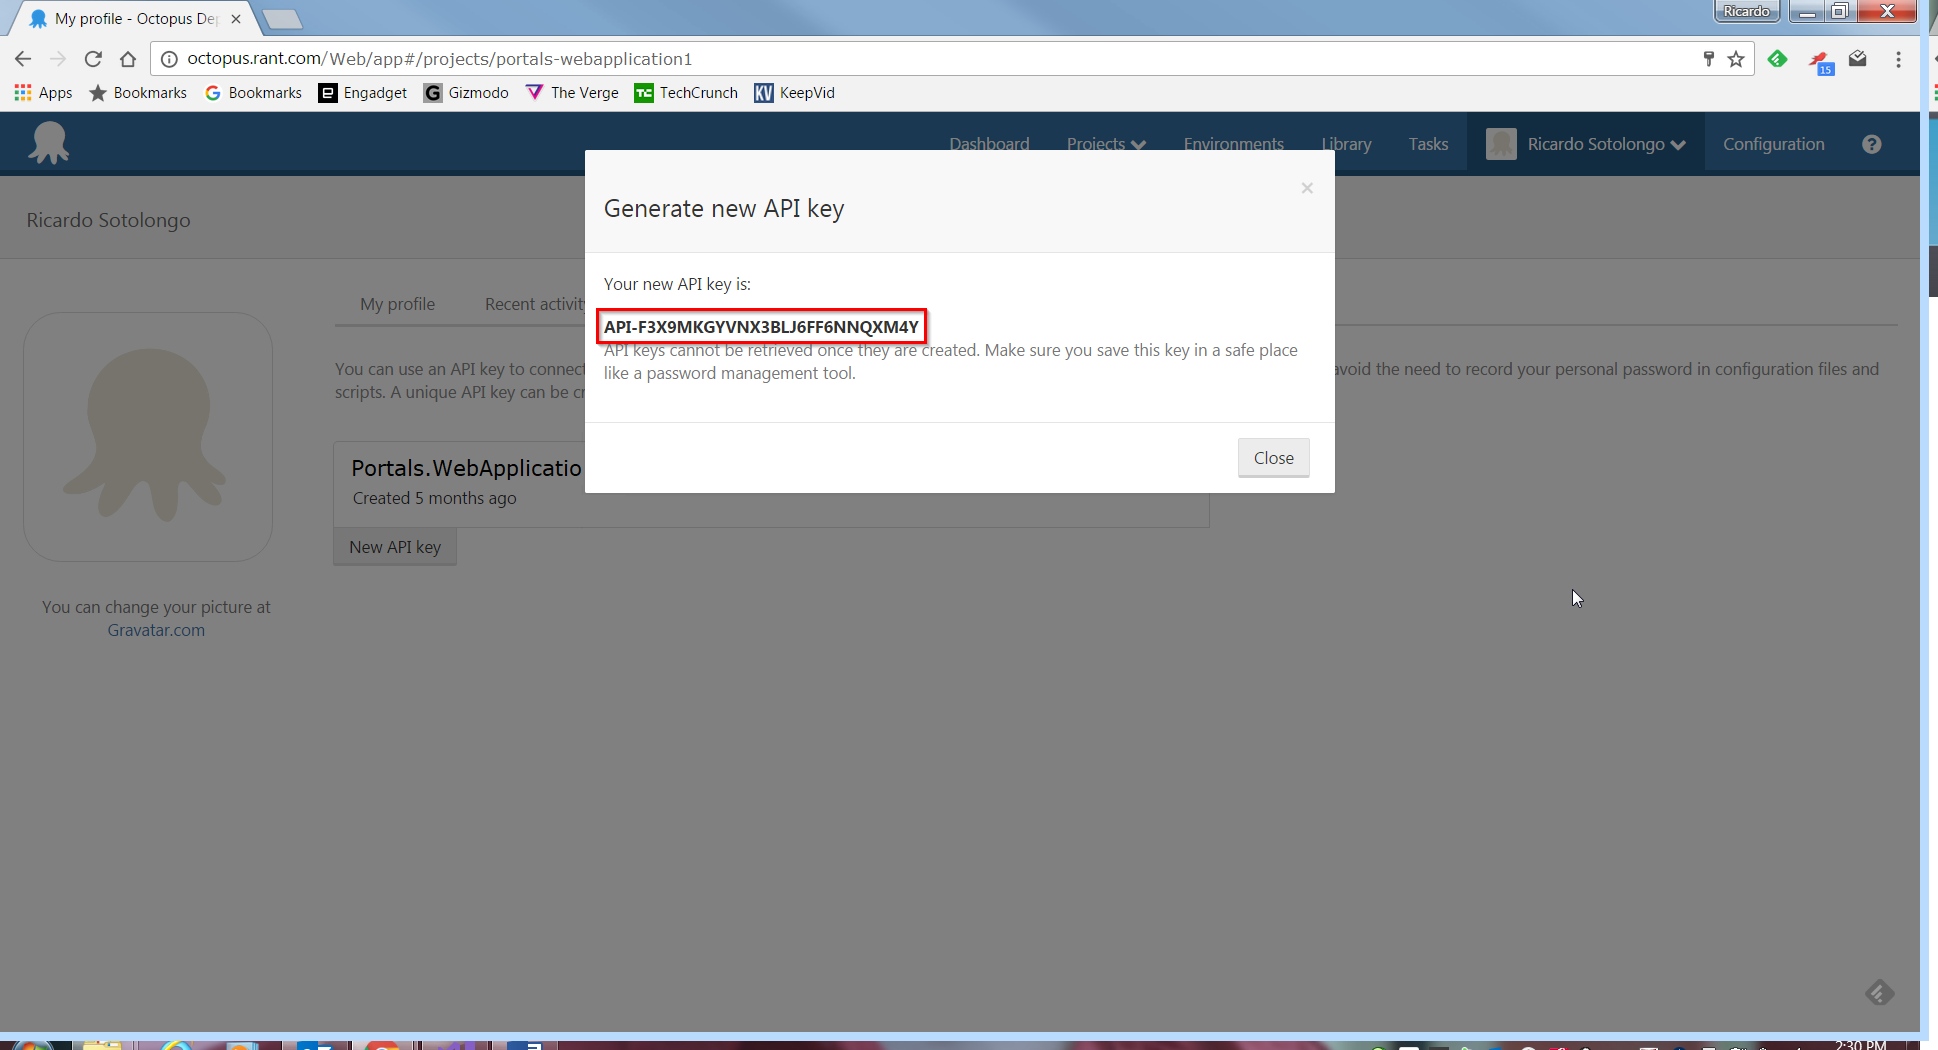
Figure 26.
Is important that you save this key because as soon as you close this dialog, you will not be able to see that value again.
One last thing, some projects could bring new problems to the table because is they are being deployed by country: meaning different Octopus projects, environments, physical path, etc. So, the idea is to have multiple “.target” files in the “Deployment” folder and added in the same way we did in the “.csproj” file. Figure 27 and 28 shows an example.
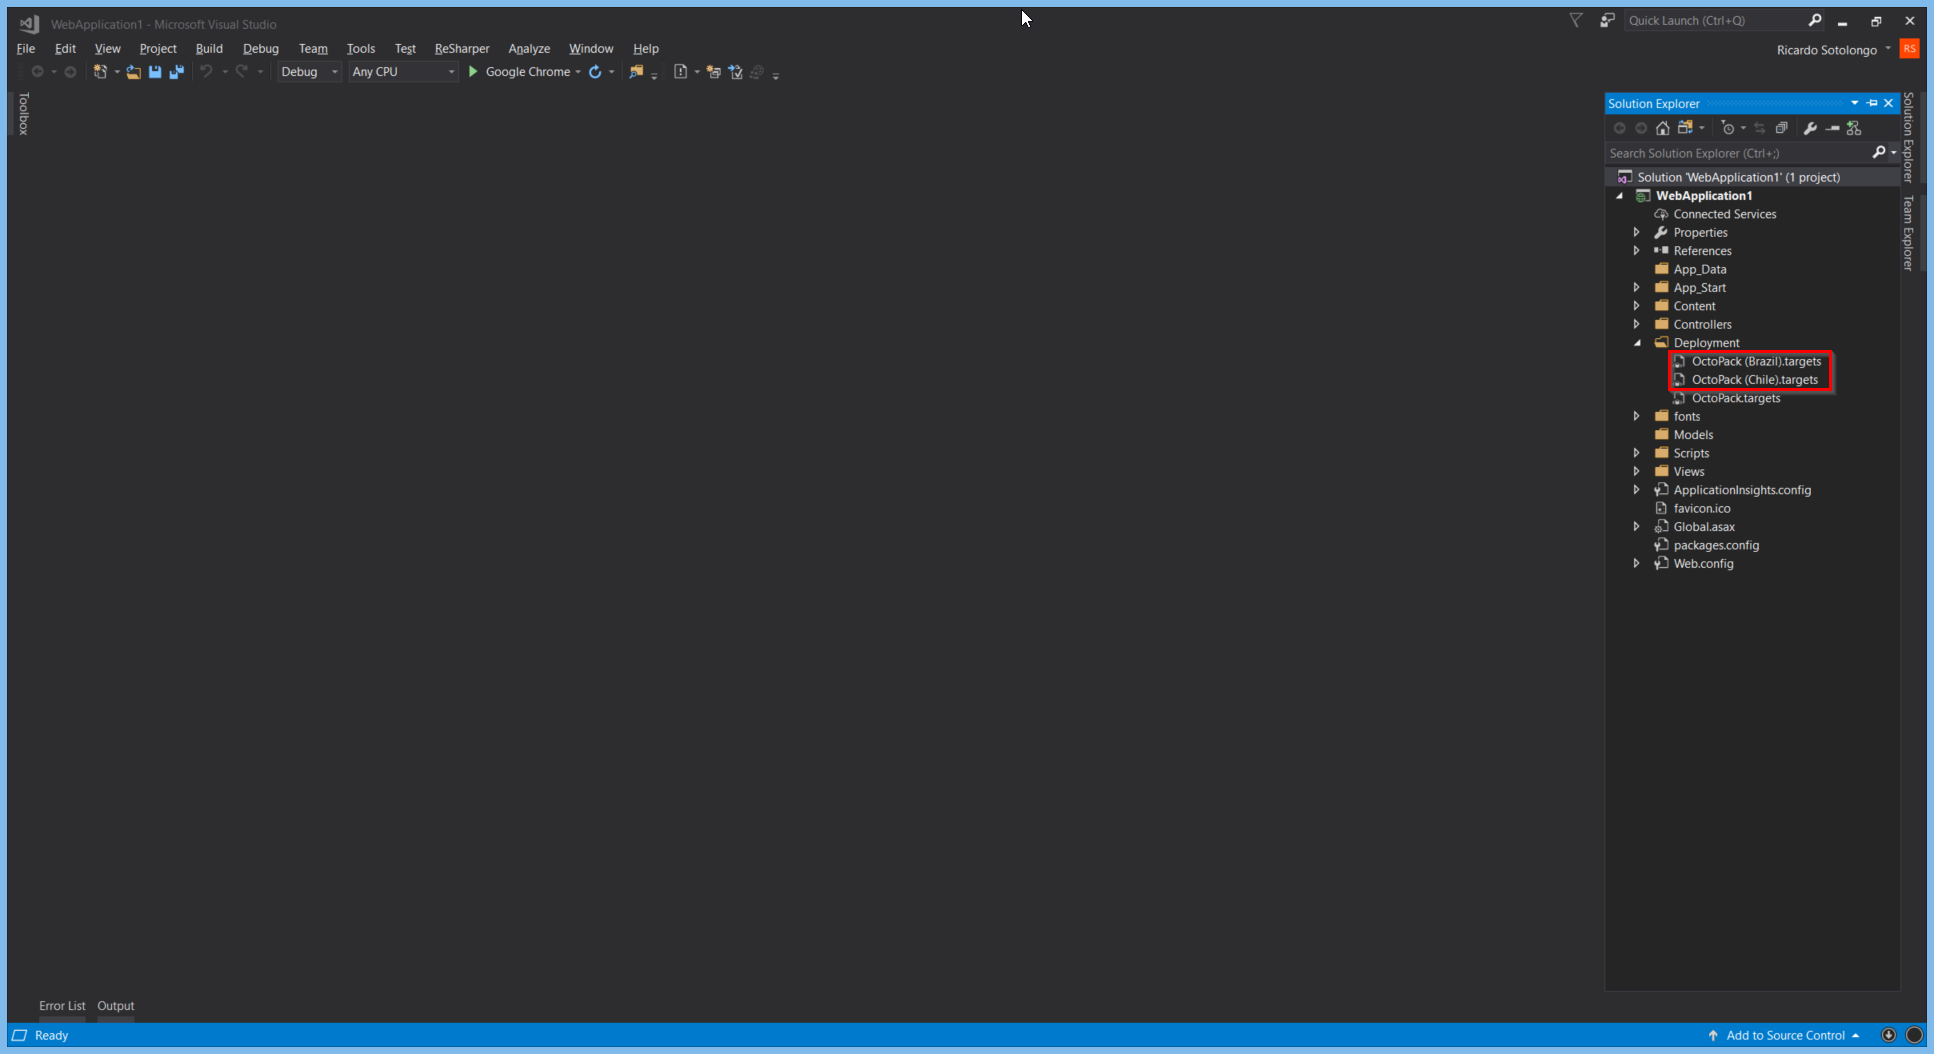
Figure 27.
Targets for Chile and Brazil were added to deploy those respective instances.
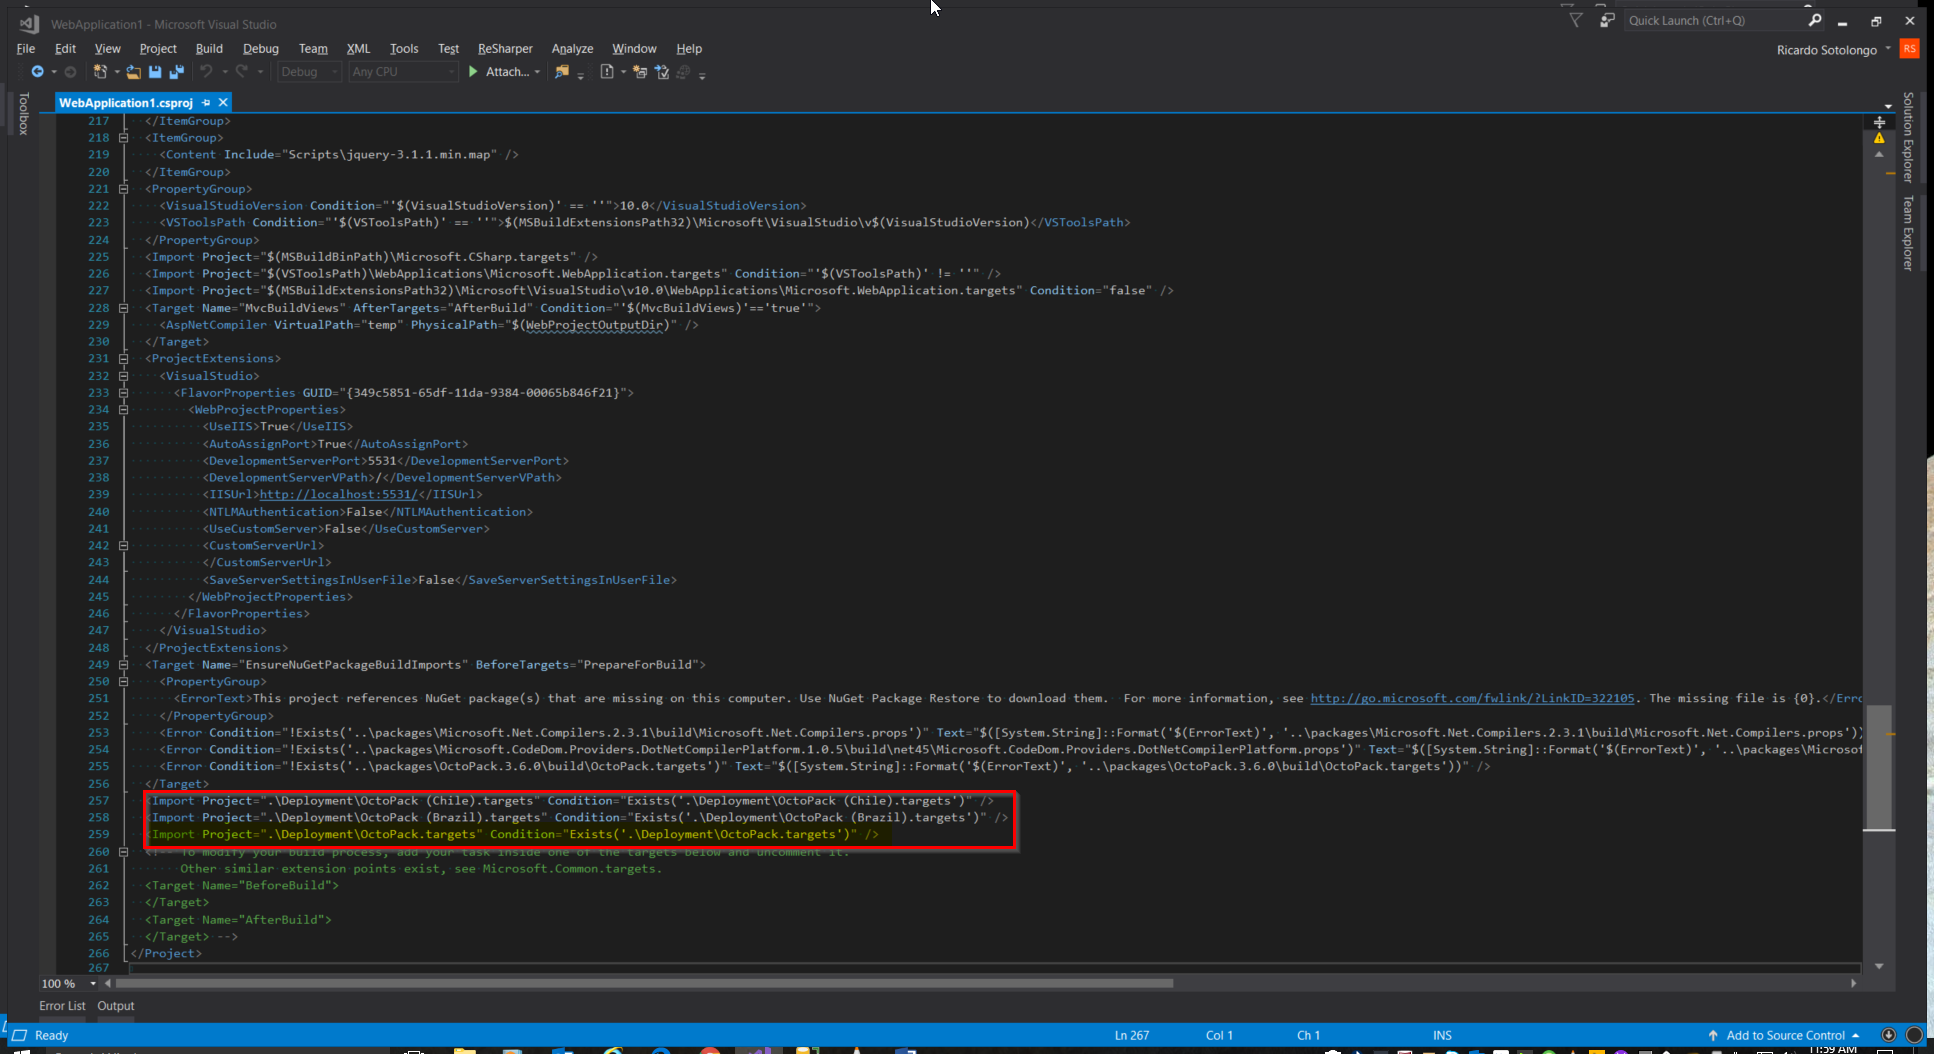
Figure 28.
Here in the .csprj is important to have the first target create (let’s call it from now on the “general one” or “generic one” -OctoPack.targets-) as the last one in the list of targets imported.
Figures 29 and 30 shows the content of those new targets created.
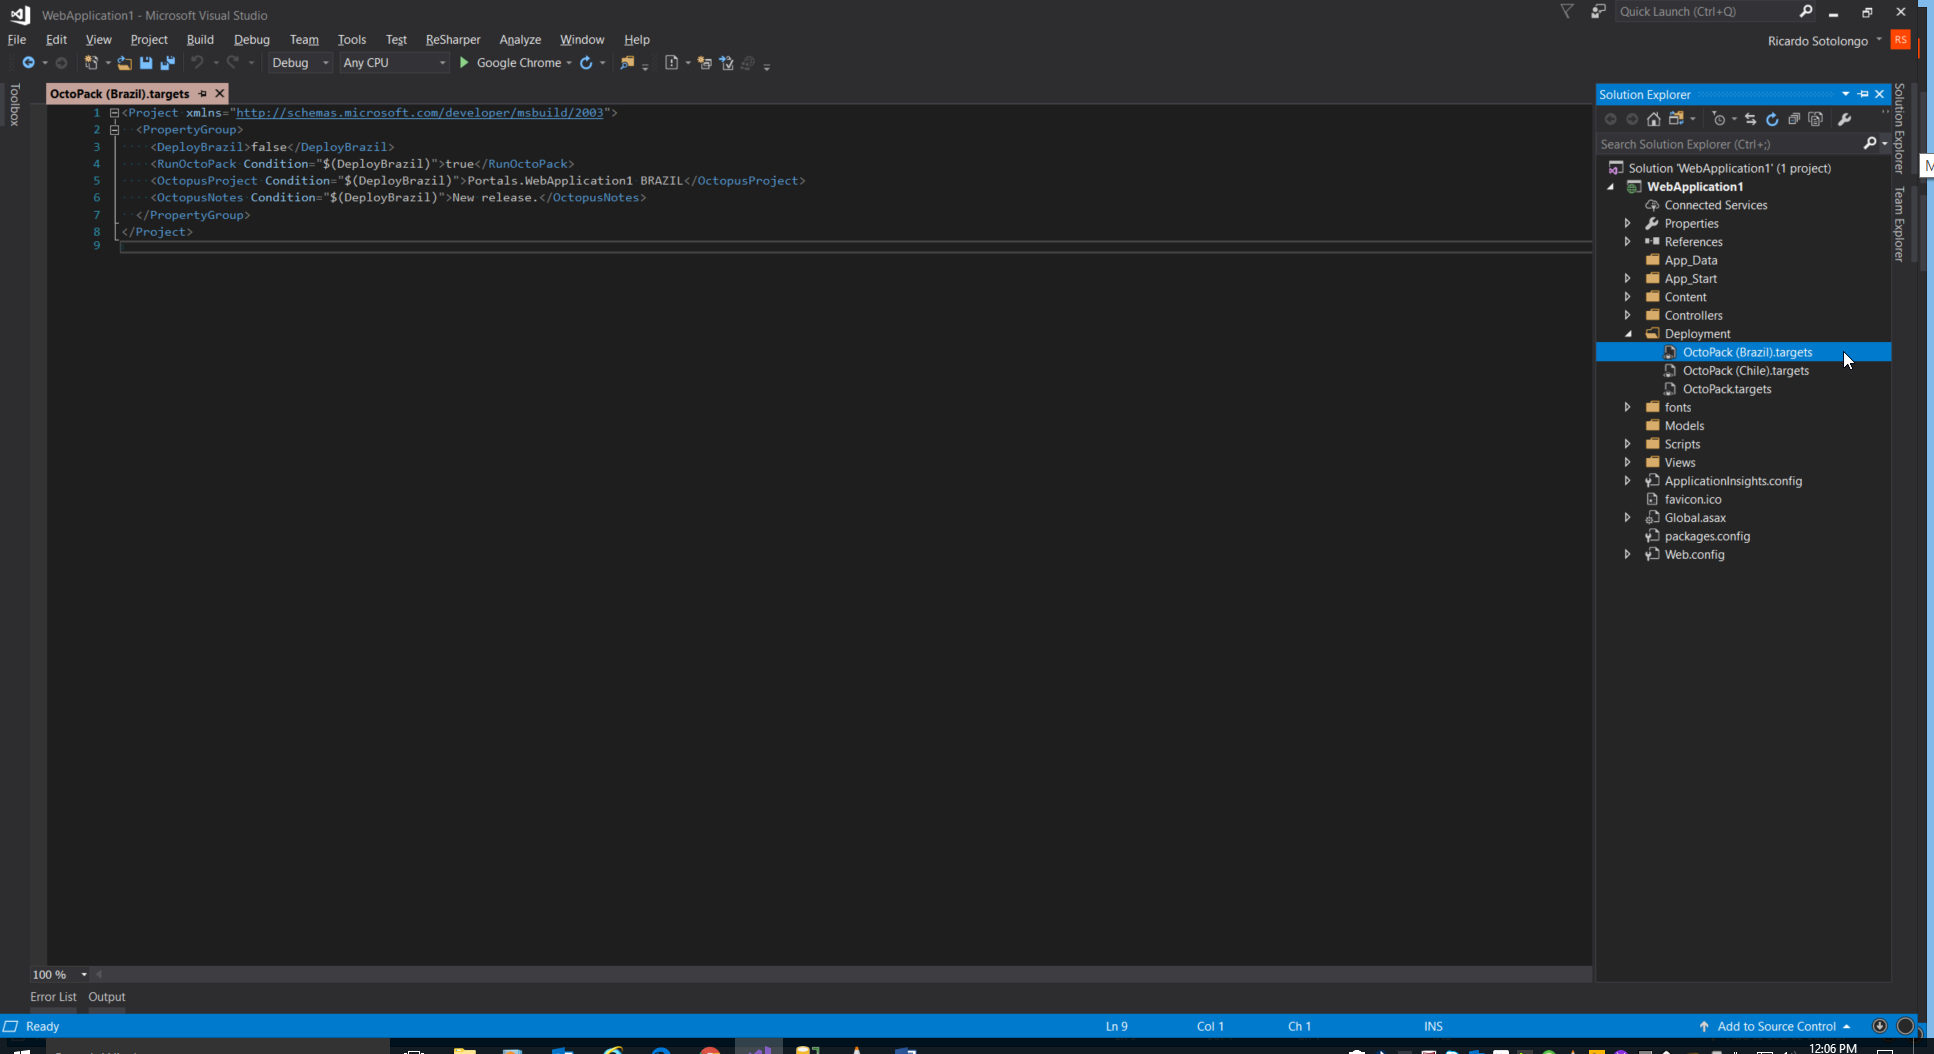
Figure 29.
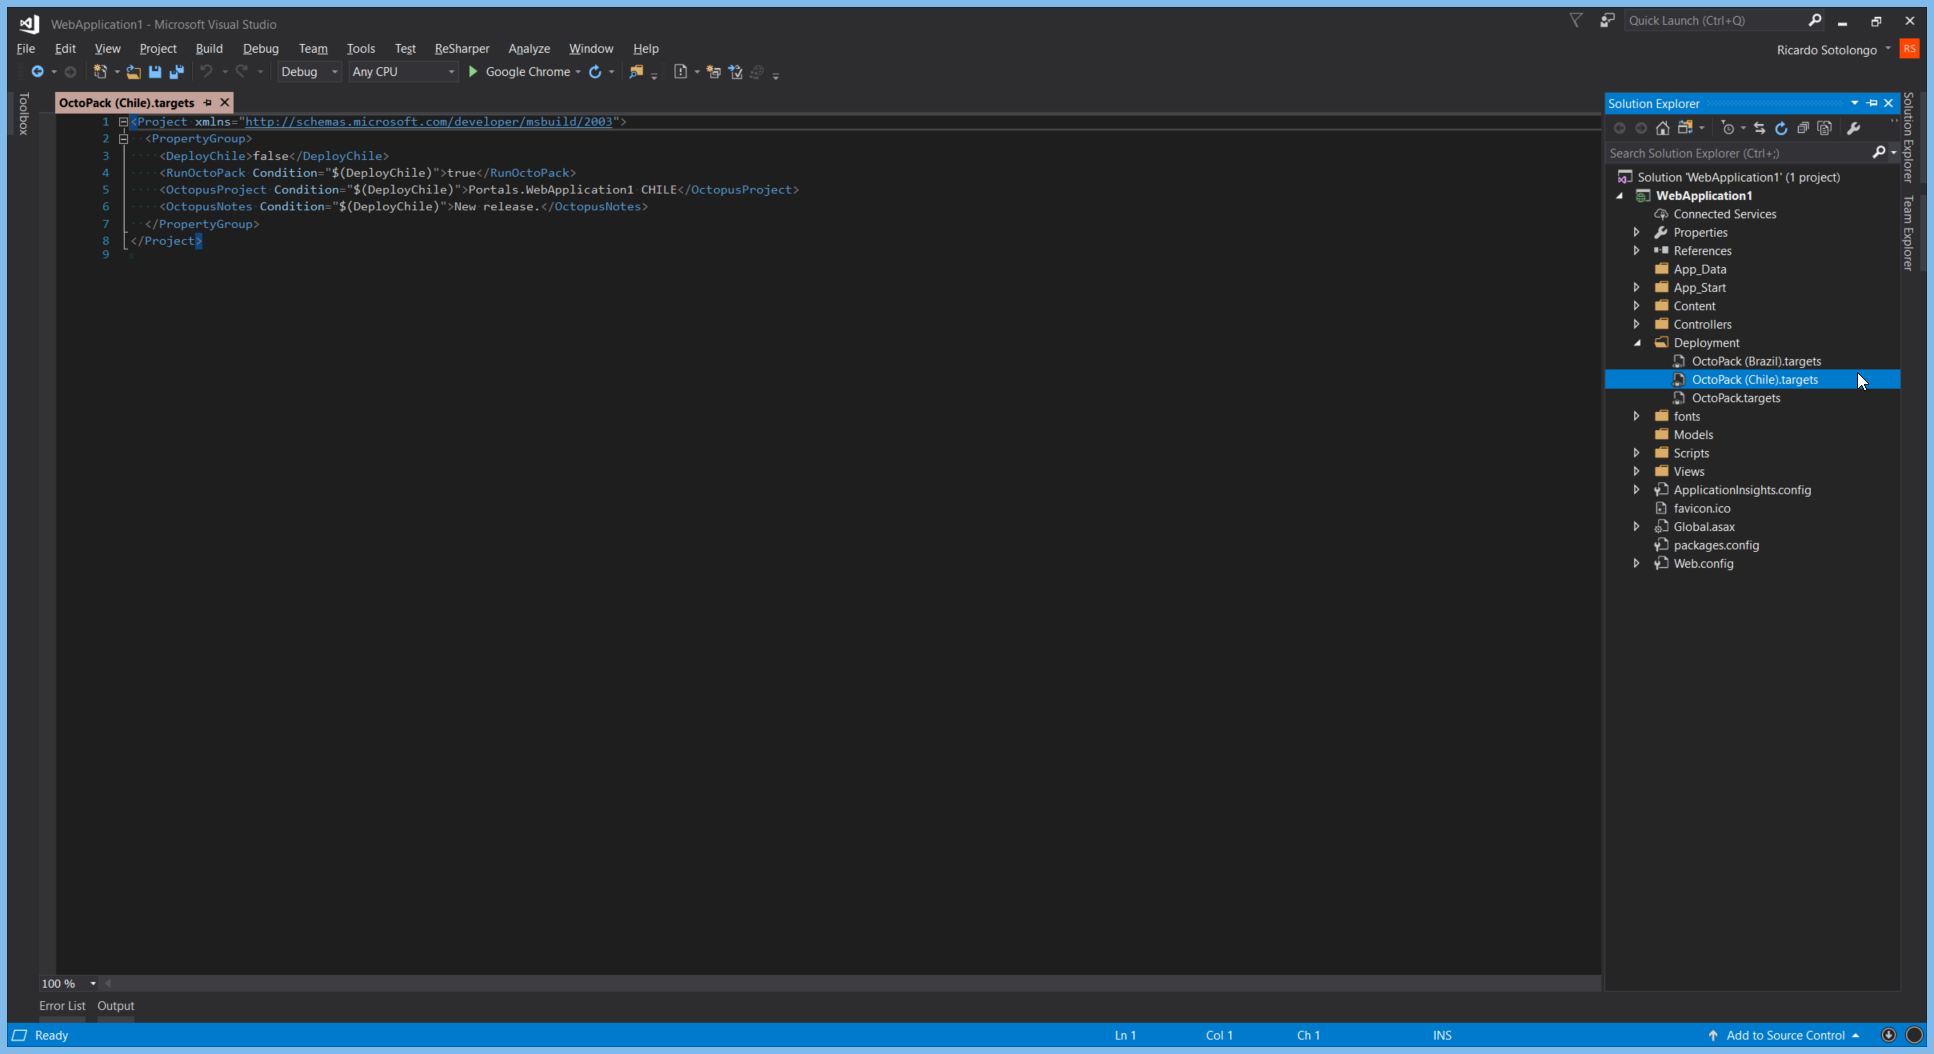
Figure 30.
Basically, both new targets are very small files sharing the same structure but with very specific values for the country instance.
RunOctoPack OctopusProject OctopusNotes
They are the variables specific to the instance that should change the value at the time to deployment. All are controlled now using a new condition that depends of the value of a new variable introduced: “Deploy…” (“DeployBrazil” and “DeployChile” in the figures). Is valid to mention that is possible to include more variables as the version we want to use, etc.
This new variable is the only one what we should change if we decided to deploy that instance. For example, is I want to deploy Brazil instance I put the value of variable “DeployBazil” as “true” in file “OctoPack (Brazil).targets” and that will make “RunOctoPack” as true and “OctopusProject” as the name of Octopus project for Brazil instance. Because the target for Brazil is imported before the generic one in the .csproj file, once that target is executed in build time, it will deploy using those values specified.
Last but not less important, we must modify the generic target to delete the value for “OctopusProject”. See figure 31.
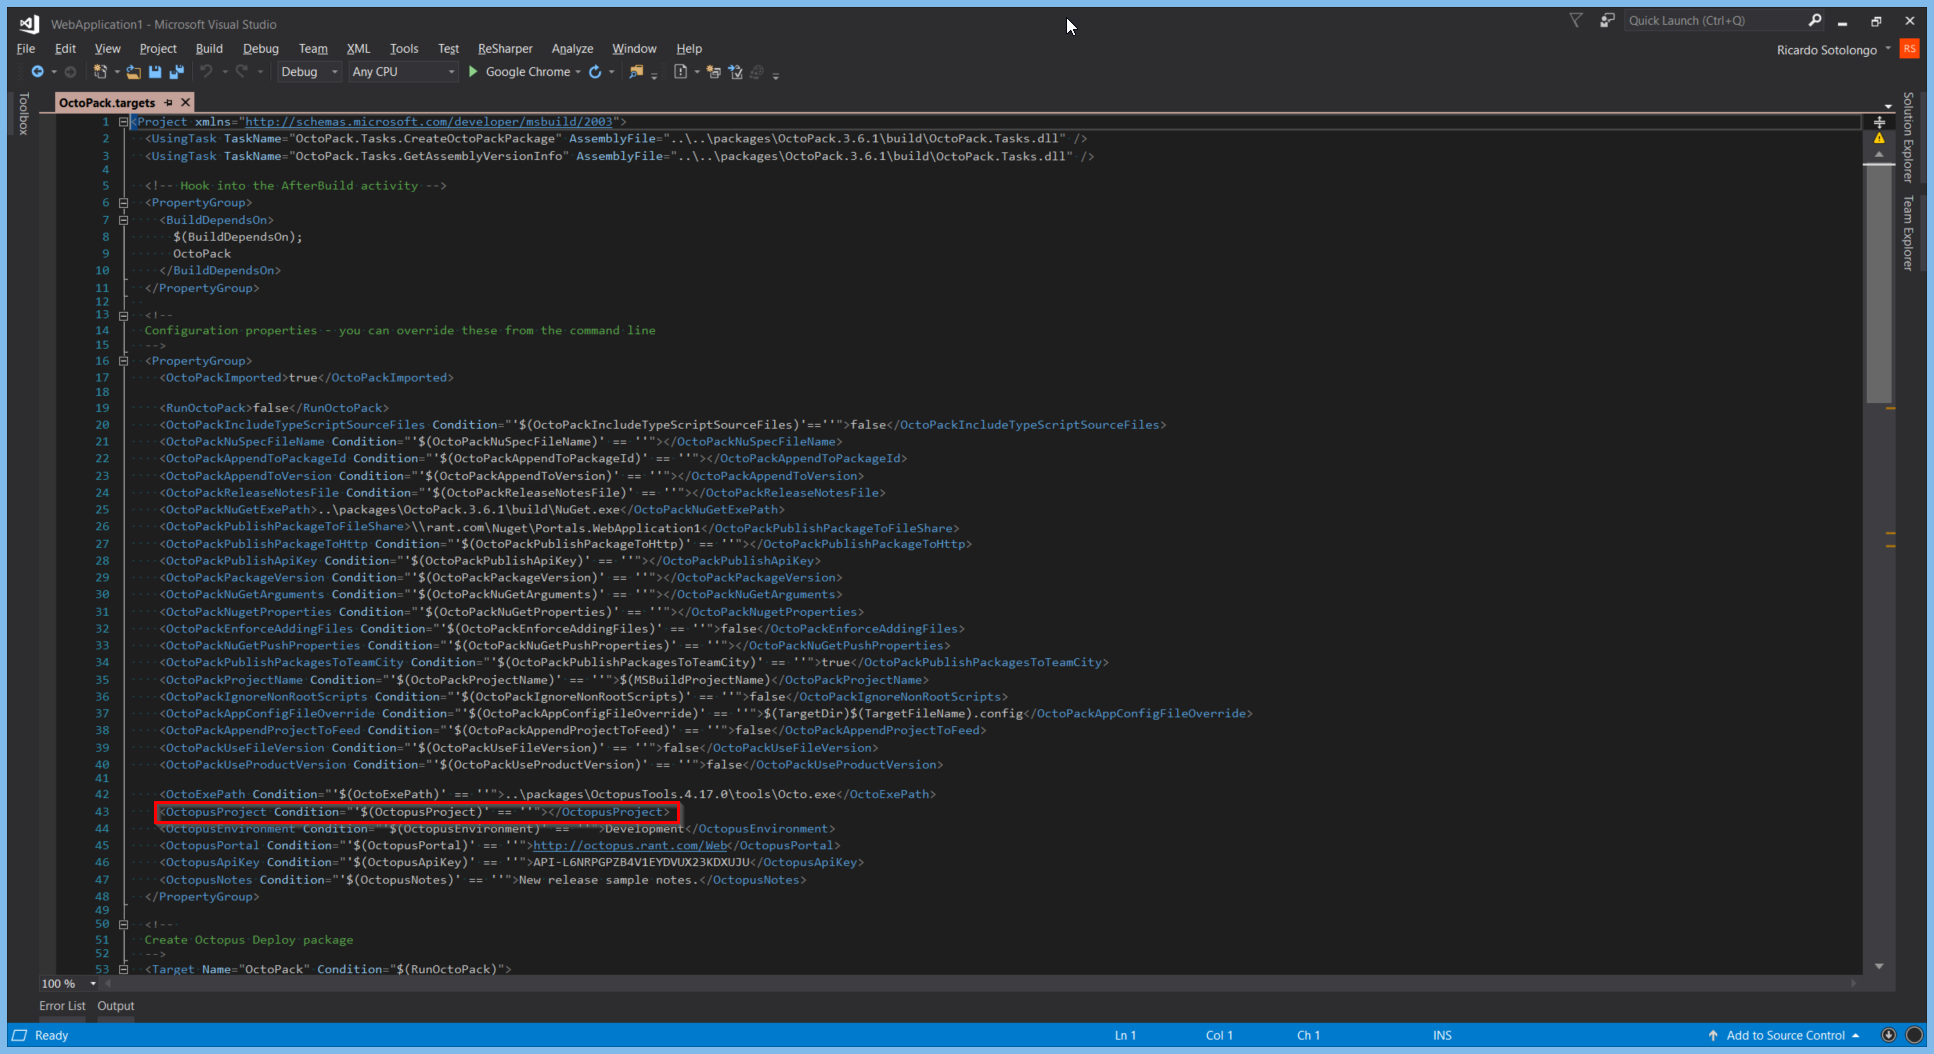
Figure 31.
I hope you enjoyed this guide and find it useful.